In the fast-paced world of finance, timely and accurate data visualization can be the difference between making informed decisions and missing out on critical opportunities. Financial dashboards serve as a powerful tool to present key metrics and trends in an intuitive and interactive manner. Python, with its rich ecosystem of libraries, offers a versatile and powerful way to create these dashboards, combining data analysis, visualization, and interactivity.
In this blog post, we will explore how to harness the power of Python to build a financial dashboard focused on option pricing. We'll leverage the capabilities of Plotly Dash, a leading framework for building interactive web applications, to create a user-friendly interface that dynamically updates with market data. This dashboard will not only calculate and visualize option prices but also provide interactive elements for users to adjust parameters and instantly see the effects on option valuations.
By the end of this tutorial, you'll have a solid understanding of how to:
- Set up a Dash application for financial data visualization.
- Implement option pricing models using Python.
- Integrate real-time data to enhance your dashboard's interactivity.
- Customize your dashboard to present data in a meaningful and visually appealing way.
The folder structure for this application is as follows:
Option Pricing Script
First let's implement the option pricing , if you are not familiar with the Black Scholes model, you can take a look here. Ensure you copy paste the following code in to a file called pricing.py
#pricing.py
import numpy as np
from scipy.stats import norm

# Alias for the cumulative distribution function (CDF) of the standard normal distribution
N = norm.cdf

# Black-Scholes formula for European call options with dividends
def BS_CALLDIV(S, K, T, r, q, sigma):
    """
    Calculate the Black-Scholes price for a European call option with dividends.

    Parameters:
    S : float
        Current stock price
    K : float
        Strike price
    T : float
        Time to maturity (in years)
    r : float
        Risk-free interest rate (annualized)
    q : float
        Dividend yield (annualized)
    sigma : float
        Volatility of the underlying stock (annualized)

    Returns:
    float
        Price of the European call option
    """
    # Calculate d1 and d2 using the Black-Scholes formula
    d1 = (np.log(S/K) + (r - q + sigma**2/2) * T) / (sigma * np.sqrt(T))
    d2 = d1 - sigma * np.sqrt(T)

    # Calculate the call option price
    call_price = S * np.exp(-q * T) * N(d1) - K * np.exp(-r * T) * N(d2)
    return call_price

# Black-Scholes formula for European put options with dividends
def BS_PUTDIV(S, K, T, r, q, sigma):
    """
    Calculate the Black-Scholes price for a European put option with dividends.

    Parameters:
    S : float
        Current stock price
    K : float
        Strike price
    T : float
        Time to maturity (in years)
    r : float
        Risk-free interest rate (annualized)
    q : float
        Dividend yield (annualized)
    sigma : float
        Volatility of the underlying stock (annualized)

    Returns:
    float
        Price of the European put option
    """
    # Calculate d1 and d2 using the Black-Scholes formula
    d1 = (np.log(S/K) + (r - q + sigma**2/2) * T) / (sigma * np.sqrt(T))
    d2 = d1 - sigma * np.sqrt(T)

    # Calculate the put option price
    put_price = K * np.exp(-r * T) * N(-d2) - S * np.exp(-q * T) * N(-d1)
    return put_price
Once the script above has been copy pasted in to the main directory, we can create the sample plotly dash application as shown below.
Plotly Dash Callback Basics
Dash callbacks are a core component of building interactive web applications with Plotly Dash. They allow your application to respond to user inputs dynamically, updating the UI and performing computations as needed. However, getting used to callbacks can take some time. Below, we will explain how callbacks and state work, and how to use them effectively in your Dash applications.
What is a Callback?
A callback in Dash is a function that gets automatically called whenever one or more specified input components change. This function can then perform calculations, update the UI, or trigger other actions based on the new values of those inputs.
What is the Difference Between Input and State?
When defining a callback in Dash, you use Input and State to specify which components should trigger the callback and which components provide additional values without triggering the callback.
-
Input: Use
Inputfor components that should trigger the callback whenever their values change. For example, if you have a dropdown menu that lets users select a stock symbol, you would useInputto ensure that the callback is triggered whenever a new symbol is selected. -
State: Use
Statefor components that provide values needed by the callback, but whose changes should not trigger the callback by themselves. This is useful when you need to gather multiple values before performing an action, such as when a user fills out a form and then clicks a submit button.
Using State in Callbacks
In many applications, you need to wait for the user to input all necessary values before performing an action. If you use Input for all these components, the callback would be triggered prematurely, possibly causing errors because not all values are available. Instead, use State for these components to gather their values without triggering the callback. Only the final action, such as clicking a submit button, should be an Input to trigger the callback.
So notice below that all the options inputs are defined as a state , whereas the button is an input which will trigger a change in output when clicked.
#app.py
import dash
from dash import dcc, html
from dash.dependencies import Input, Output, State
import dash_bootstrap_components as dbc
from pricing import BS_CALLDIV, BS_PUTDIV
# Initialize the Dash app
app = dash.Dash(__name__, external_stylesheets=[dbc.themes.BOOTSTRAP])

# Layout of the app
app.layout = dbc.Container([
    dbc.Row([
        dbc.Col([
            html.Label('Option Type', style={'fontWeight': 'bold', 'fontSize': '16px'}),
            dcc.Dropdown(
                id='option-type',
                options=[
                    {'label': 'Call', 'value': 'call'},
                    {'label': 'Put', 'value': 'put'}
                ],
                value='call',
                clearable=False,
                style={'marginBottom': '10px'}
            )
        ], width=4, style={'marginBottom': '15px'}),
    ]),
    html.Br(),
    dbc.Row([
        dbc.Col([
            html.Label('Stock Price (S)', style={'fontWeight': 'bold', 'fontSize': '16px'}),
            dcc.Input(id='stock-price', type='number', value=100, step=0.01, style={'width': '100%', 'padding': '10px', 'borderRadius': '5px', 'border': '1px solid #ccc'})
        ], width=4, style={'marginBottom': '15px'}),
    ]),
    html.Br(),
    dbc.Row([
        dbc.Col([
            html.Label('Strike Price (K)', style={'fontWeight': 'bold', 'fontSize': '16px'}),
            dcc.Input(id='strike-price', type='number', value=100, step=0.01, style={'width': '100%', 'padding': '10px', 'borderRadius': '5px', 'border': '1px solid #ccc'})
        ], width=4, style={'marginBottom': '15px'}),
    ]),
    html.Br(),
    dbc.Row([
        dbc.Col([
            html.Label('Days to Expiry', style={'fontWeight': 'bold', 'fontSize': '16px'}),
            dcc.Input(id='days-to-expiry', type='number', value=30, step=1, style={'width': '100%', 'padding': '10px', 'borderRadius': '5px', 'border': '1px solid #ccc'})
        ], width=4, style={'marginBottom': '15px'}),
    ]),
    html.Br(),
    dbc.Row([
        dbc.Col([
            html.Label('Risk-free Rate (r)', style={'fontWeight': 'bold', 'fontSize': '16px'}),
            dcc.Input(id='risk-free-rate', type='number', value=0.05, step=0.01, style={'width': '100%', 'padding': '10px', 'borderRadius': '5px', 'border': '1px solid #ccc'})
        ], width=4, style={'marginBottom': '15px'}),
    ]),
    html.Br(),
    dbc.Row([
        dbc.Col([
            html.Label('Dividend Yield (q)', style={'fontWeight': 'bold', 'fontSize': '16px'}),
            dcc.Input(id='dividend-yield', type='number', value=0, step=0.01, style={'width': '100%', 'padding': '10px', 'borderRadius': '5px', 'border': '1px solid #ccc'})
        ], width=4, style={'marginBottom': '15px'}),
    ]),
    html.Br(),
    dbc.Row([
        dbc.Col([
            html.Label('Volatility (sigma)', style={'fontWeight': 'bold', 'fontSize': '16px'}),
            dcc.Input(id='volatility', type='number', value=0.3, step=0.01, style={'width': '100%', 'padding': '10px', 'borderRadius': '5px', 'border': '1px solid #ccc'})
        ], width=4, style={'marginBottom': '15px'}),
    ]),
    html.Br(),
    dbc.Row([
        dbc.Col([
            dbc.Button('Price Option', id='submit-button', n_clicks=0, color='primary', style={'width': '100%', 'padding': '10px', 'fontSize': '16px'})
        ], width=4, style={'marginBottom': '15px'}),
    ]),
    html.Br(),
    dbc.Row([
        dbc.Col([
            html.Div(id='output-container', children='', style={'padding': '10px', 'borderRadius': '5px', 'border': '1px solid #ccc', 'backgroundColor': '#f9f9f9'})
        ], width=12),
    ])
], fluid=True, style={'padding': '20px', 'backgroundColor': '#f7f7f7', 'borderRadius': '10px', 'boxShadow': '0 2px 5px rgba(0,0,0,0.1)'})


# Callback function to handle the inputs and perform calculations
@app.callback(
    Output('output-container', 'children'),
    Input('submit-button', 'n_clicks'),
    State('option-type', 'value'),
    State('stock-price', 'value'),
    State('strike-price', 'value'),
    State('days-to-expiry', 'value'),
    State('risk-free-rate', 'value'),
    State('dividend-yield', 'value'),
    State('volatility', 'value')
)
def update_output(n_clicks, option_type, S, K, days_to_expiry, r, q, sigma):
    if n_clicks > 0:
        T = days_to_expiry / 252  # Convert days to years
        price = BS_CALLDIV(S=S, K=K, T=T, r=r, q=q, sigma=sigma ) if option_type == 'call' else BS_PUTDIV(S=S, K=K, T=T, r=r, q=q, sigma=sigma )
        return f'Price = {price}, Option Type: {option_type}, S: {S}, K: {K}, T: {T}, r: {r}, q: {q}, sigma: {sigma}'
    return ''

if __name__ == '__main__':
    app.run_server(debug=True)
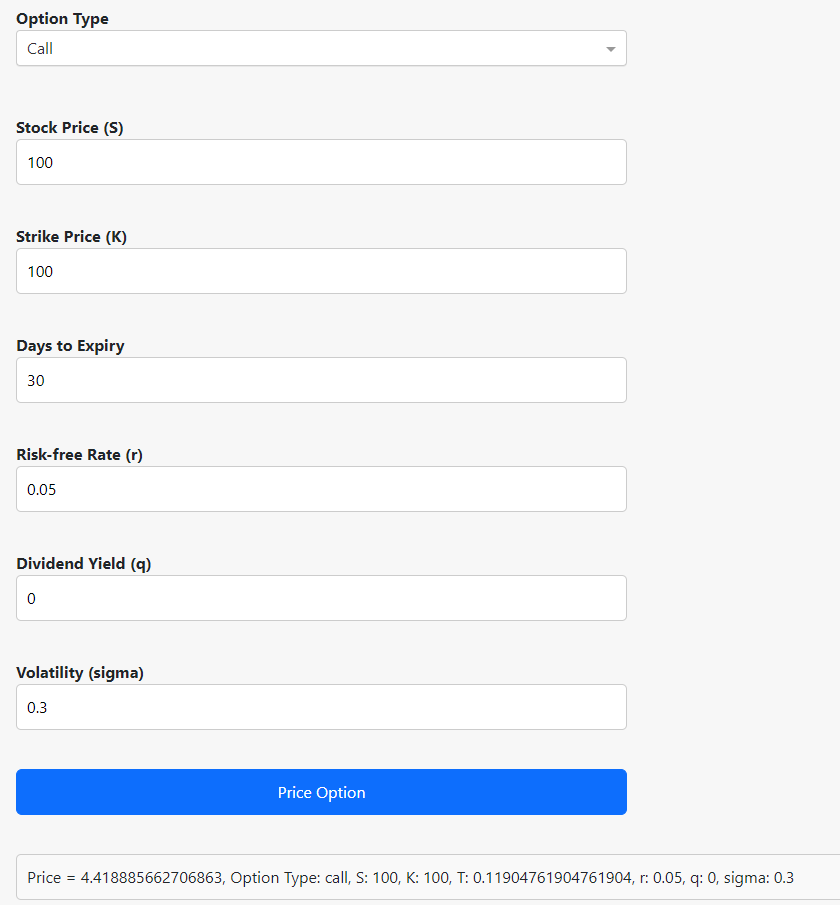
And once we have started the app with python app.py , we will get the final result which is a stylish dashboard accessible in our web browser from http://127.0.0.1:8050/