In this post, we’ll walk through a full step-by-step guide on setting up your API keys and share best practices for using them in your algo trading projects. If you get stuck or want to see the full code in one place, we’ve also linked to a GitHub repo where everything is organised and easy to follow.
What is an API Key? 🔑
An API key is basically like login details, but for a program. It lets one bit of software (in our case, your trading bot) prove to another (Bybit) that it's allowed to do stuff — like place trades on your behalf. Think of it like a password, but for bots.
Creating your API key is the first proper step in building any algo-trading setup. Don’t worry — the process is exactly the same whether you’re using a demo account or going live 💼.
⚠️ Just a heads-up: treat your API key like you would your bank PIN. If it ends up in the wrong hands, someone could make trades on your account.

Step-by-Step Guide to Creating Your API Key
In this section, we’ll walk you through the setup with step-by-step guidance and images to make creating your API key nice and easy. First things first — log in to your Bybit account and click on the little person icon in the top right, as shown below 👤.

Next, click on the API section from the menu, as shown below 🔧.

Now click on the “Create API Key” button to get things rolling 🛠️.
Give your API key a name you’ll recognise, then choose the permission level you want to give it 🔐. Bybit now offers two options: “Read-only” and “Read-write.” Since we’ll be placing orders and interacting with the matching engine, make sure to select “Read-write” at this step — otherwise your trading bot will only be able to read account information and therefore won't be a proper trading bot at all.
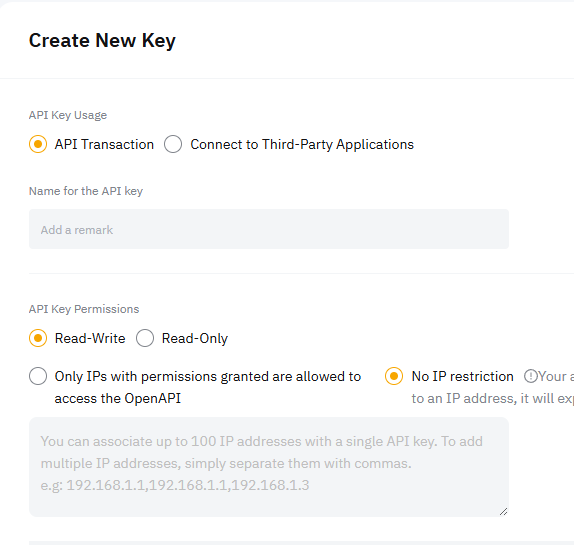
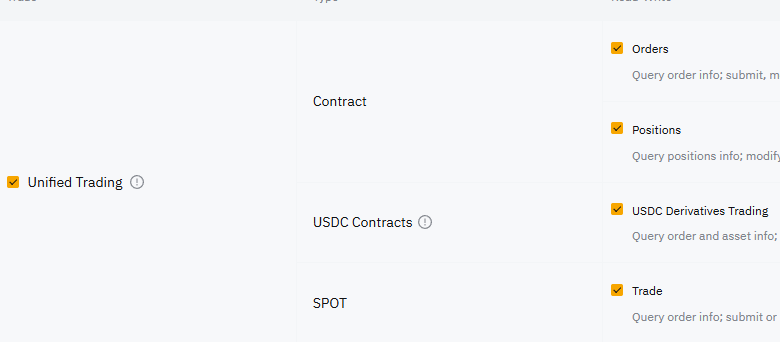
Ensure you check unified trading box shown below ⬇️
You can also add some extra security to your API key at this stage 🔒 — things like IP restrictions. Just a heads-up: if you don’t whitelist an IP address, the key will expire after 3 months. If you’re running your bot from a server, it’s a good idea to grab the server’s IP and paste it into the whitelisted IPs section to keep things locked down and running smoothly.
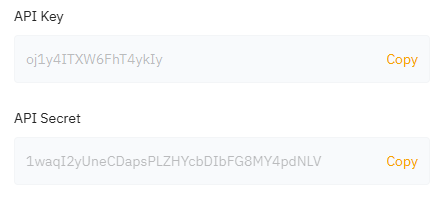
Once your API key has been generated, make sure to copy both the API Key and Secret Key and save them somewhere safe 🗝️. Bybit won’t show you the Secret Key again, so it’s really important you keep hold of it. And remember — never share your keys with anyone. Treat them like your bank details!
It’s a good idea to save your API keys somewhere handy so you can access them easily later. In the example below, we’re using a simple .json file 📁 — just replace the "codearmo", "api_key" and "api_secret" values with the ones you got in the previous step 🔐. And don’t forget: if you’re using a testnet account, make sure the "testnet" value is set to true — otherwise, leave it as false ⚠️.
In a later stage of this guide, we will load these keys in with the name keys.json although you can name your file whatever you like.
{
  "codearmo": {
    "api_key" : "jhdfJBHFWEDSsfsd",
    "api_secret" : "jwedfbwefhbw4DJBA2bdsaQIBEJBFDSWAsssawer",
    "testnet": false

    }

}
You’re all set! 🎉 You can now use your API key to connect to Bybit’s API and plug it into your trading bot or any other software you’re building.
Installing Pybit 📦
Pybit is a handy little Python package that makes it easy to interact with Bybit’s API. With it, you can manage trades, access account info, and handle orders — all from your Python scripts.
Here’s how to get it installed:
- Open your command prompt or terminal.
- Make sure you’ve got pip installed. You can check by typing pip and hitting Enter. If it’s not there, you can grab it from the official Python website.
- Type the following command ⬇️
pip install pybit
Once that’s done, you’re ready to start connecting Python with Bybit! 🐍⚡
You should see something similar to the output below ⬇️, note that I am using pybit==5.10.0 , in the future, if something stops working, perhaps you can just do pip install pybit==5.10.0

Check Your API Connection in Python
Right then — let’s make sure your API key actually works. 🧪 Use the little helper script below to do three things:
a) Load in your keys from the JSON file
b) Create an HTTP session using Pybit so you’re ready to start talking with the Bybit API.
c) Send a test request to Bybit to ensure our key works
from pybit.unified_trading import HTTP
import json

with open('keys.json') as f:
    keys = json.load(f)


key = keys['codearmo']['api_key']
secret = keys['codearmo']['api_secret']
testnet = testnet=keys['codearmo']['testnet']

session = HTTP(api_key=key, api_secret=secret, testnet=testnet)


# Ping Bybit with an authenticated call to make sure its working
try:
    response = session.get_account_info()
    print("✅ API keys are working!")
    print("Account Info:", response.get('retMsg'))
except Exception as e:
    print("❌ Failed to authenticate. Please check your API keys.")
    print("Error:", e)
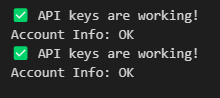
If the key is working you show see the image below ⬇️
![]()
If you see an error like the one below, it means something’s gone a bit wrong. It could be that you’ve entered the wrong API key or secret, you’re mixing up testnet and live mode, or there’s a hiccup with how the keys are being loaded from your JSON file. Double-check those bits first — it’s nearly always one of them! 🕵️♂️
❌ Failed to authenticate. Please check your API keys.
Error: API key is invalid. (ErrCode: 10003) (ErrTime: 06:07:42)
Cool, hopefully that means we are able to continue our algo trading journey. We have taken the first steps towards creating a profitable trading bot with Python and Bybit.
Pro Trader Setup for API Key Management in Algo Trading
Alright, so first things first — let’s talk about why the previous setup isn’t ideal if you’re getting serious about algo trading. When you're building crypto bots, you want things to be as seamless as possible, especially when switching between your demo and live trading accounts. The setup we used before works, but it’s a bit rigid.
If you're aiming to build proper tools to trade Bitcoin or altcoins with Python, it's good practice to tidy things up a bit. One way to do that is by using a get_client() method that handles your API key loading behind the scenes — clean, reusable, and a lot easier to manage.
We’ll be using environment variables to store your keys safely (instead of hardcoding them or using raw JSON), and loading them with the python-dotenv package. This way, everything stays nice and secure, and you’ve got a solid base for scaling things up later.
First up let's create a .env file and paste in the keys to both live and demo accounts ⬇️In the Github repo this is saved as .env.dev, but you should save yours as .env
BYBIT_TESTNET_API_KEY=6VS6VkAnPAqxF7M8nw
BYBIT_TESTNET_API_SECRET=kZ7DMGFJEj4Xo6NcSHhasiK9gLam0jufKtr9
BYBIT_LIVE_API_KEY=VnMA6Sx7kPqw8vF6n
BYBIT_LIVE_API_SECRET=9KtrjfLoJcDXsaHMuG74nZkEYiKp0ham
Make sure you’ve installed python-dotenv using pip, as we’ll be using its handy load_dotenv() method to automatically load in our environment variables cleanly. Just run the following in your terminal if you haven’t already:
pip install python-dotenv
Copy thw helper script below ⬇️ and save it in a folder called helpers, which should sit at the same level as your main trading scripts. Naming the file something like get_bybit_http.py works well. This kind of setup keeps things tidy and modular — plus, it means you can reuse the same code across different bots or projects without having to repeat yourself.
import os
from dotenv import load_dotenv
from pybit.unified_trading import HTTP

load_dotenv()


def get_client(testnet: bool) -> HTTP:
    if testnet:
        api_key = os.getenv("BYBIT_TESTNET_API_KEY")
        api_secret = os.getenv("BYBIT_TESTNET_API_SECRET")
    else:
        api_key = os.getenv("BYBIT_LIVE_API_KEY")
        api_secret = os.getenv("BYBIT_LIVE_API_SECRET")

    client = HTTP(api_key=api_key, api_secret=api_secret, testnet=testnet)
    try:
        response = client.get_account_info()
        print("✅ API keys are working!")
        print("Account Info:", response.get("retMsg"))
        return client
    except Exception as e:
        print("❌ Failed to authenticate. Please check your API keys.")
        print("Error:", e)
        return client

Once it’s saved, you can import and use it like this ⬇️
from helpers.get_bybit_http import get_client

# For Demo trading
client = get_client(testnet=True)

# For Live Trading
client = get_client(testnet=False)
Notice how seamless it is to switch between your demo and live accounts — just change the testnet argument and you're off.
🚀 Bybit Python Tools
A clean, modular toolkit for algo trading on Bybit using Python. Includes helper methods, API key management, and more.
View on GitHub
In the next section we will begin looking at some neat ways to get data from Bybit's API with Python.