if you're building with FastAPI and want to take your app from local development to a live cloud server, you're in the right place. In this step-by-step guide, you'll learn how to deploy a FastAPI application on a Debian-based Linux virtual machine, set up a reverse proxy with Nginx, and get your app running securely and reliably — all on the cloud.
We’ll be using Ubuntu 24.04, but this guide works with most Debian-based distributions across leading cloud platforms like AWS, Google Cloud, DigitalOcean, Linode, or Azure. As long as you're using a Linux VM, you’ll be good to go.
For completeness, we will give two methods for deploying your FastAPI app , one with systemd and the other with Docker
Why Deploy Your FastAPI App to the Cloud?
- 💸 Low cost: Hosting simple applications on the cloud is surprisingly cheap.
- 🌍 Access anywhere: Make your app publicly accessible from any device.
- 🧪 Real-world testing: Deploy early, test continuously, and iterate faster.
- 🔁 Git integration: Push updates via Git and streamline your development-to-deployment workflow.
Once you've chosen your cloud provider and set up a sudo-enabled user on your Linux virtual machine, there are a few essential steps to prepare your environment before deploying your FastAPI application.
Before jumping into building your API, it's important to properly configure your Ubuntu server (or any Debian-based Linux VM) to ensure a smooth and secure deployment. In this phase, we’ll handle basic setup tasks like installing development tools, securing the server, and preparing the system for your FastAPI app deployment. Whether you're using AWS EC2, Google Cloud, DigitalOcean, or any other major cloud hosting provider, these steps lay the groundwork for a reliable production environment.
First off install curl so you can install the necessary dev tools, install curl so we can make requests
sudo apt install curl -y
⏩ Let's also install Git. If you are using a private github repo, or want help setting up an ssh key on your server, this guide will help you out
sudo apt install git
⏩ And then install the necessary Python tools on the server, feel free to take a look at this script on github before running it on your virutal machine.
curl -sSL https://raw.githubusercontent.com/codearmo/ShellHelpers/main/python_dev_install.sh | bash

Creating a FastAPI Project Repository for Deployment
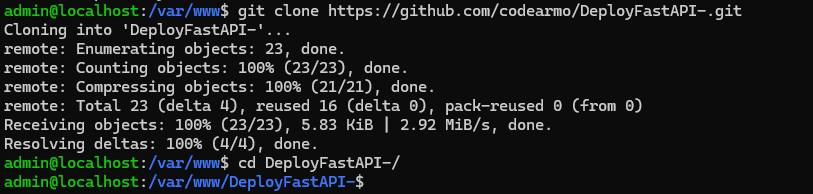
Since this guide is focused solely on deploying FastAPI to a cloud server, we’ll be using the simplest possible FastAPI app. If you're following along to learn or test the deployment workflow, you can clone the example FastAPI project below. This is the repo we’ll use throughout the rest of the deployment guide. You can take a look at the files here.
git clone https://github.com/codearmo/DeployFastAPI-.git
This fastapi repo is structured as follows
DeployFastAPI/
├── app/
│   └── main.py
│
├── DockerDeploy/
│   ├── fastapi.Dockerfile       # Dockerfile for containerized deployment
│   ├── myapi.conf               # Nginx config for Docker
│   ├── myapi.service            # Systemd service (optional reference)
│   └── start.sh                 # Shell script to build & run Docker container
│
├── systemdDeploy/
│   ├── myapi.conf               # Nginx config for systemd setup
│   ├── myapi.service            # systemd unit file
│   └── start.sh                 # Shell script to launch the FastAPI app
│
├── requirements.txt             # Python dependencies
├── LICENSE                      # License file
├── README.md                    # Project documentation
├── .gitignore                   # Git ignore rules
├── venv/                        # Python virtual environment (not included in Docker)
└── .git/                        # Git repo metadata
⏩ Once cloned, open the FastAPI app in your preferred editor (like VS Code) to start setting up your cloud deployment ☁️.
OK making sure you are in the root diretory, let's just try run this thing locally so we know what to expect when we deploy to the virtual machine.
📌 Create a python virtual environment
python3 -m venv venv
⏩Activate virtual environment
source venv/bin/activate
⏩ install requirements
pip install -r requirements.txt
Ok so let's take a look at main.py
from fastapi import FastAPI

app = FastAPI()


@app.get("/")
async def home():
    return {"message": "Hello From Linux Server"}


@app.get("/another")
async def another_test_route():
    return {"message": "This is another Test from codearmo.com series"}
Ok cool, so that is our super simple template fastapi app.
Let's run it locally
uvicorn app.main:app --reload
All being well, our fastapi app should be running locally

And if we navigate to the local server url at http://127.0.0.1:8000/

That’s all we need to get our FastAPI app running in a local development environment. Now we’re ready to deploy the application to a cloud-based virtual machine 🖥️ and run it in a real production setting 🔧!
📌please note for the remainder of this guide I will be using a sudo user named 'admin' , you need to ensure anywhere you see admin, you replace with your sudo user
Clone Repo on Virtual Machine
For those that are just following along with our example repo, this is very simple, but if you need to set up ssh keys 🔑 and clone your files, check out this guide.
Ok first off let's follow standard practice and put our files in /var/www on our virutal machine
mkdir /var/www && cd /var/www

⏩ Give our sudo user ownership of the folder
sudo chown -R $USER:www-data /var/www
✅ OK great now we are in the right directory and permissions issues resolved.
⏩clone the test repo , or replace with your own url if you are deploying your own app
git clone https://github.com/codearmo/DeployFastAPI-.git
Choose Deployment Strategy
In this guide, we’ll walk through two FastAPI deployment strategies — both are production-ready, but cater to different preferences and workflows:
Pick the method that works best for your setup and follow that section only. Once your app is running under systemd or Docker, jump ahead to the Nginx setup 🔁 — that’s where we’ll expose your FastAPI app to the internet using a secure, production-grade reverse proxy.
🧭 Not sure which one to choose?
No worries — both approaches are valid. If you're deploying on a single VPS or learning Linux servers, start with systemd. If you're already using containers or plan to scale, go with Docker.
🔥 Or you could do both and come back to the other later!
1) Systemd Deployment
Systemd is a great way to run tasks, on Linux servers, it may in fact be one of the most useful things a new Linux user can learn for cloud computing. In this section we will show how to
✅ Systemd Deployment Workflow
1)🔐 Set Up a Virtual Environment
- Create venv
- install requirements
2) 📝 Create a Systemd Service File
-
Name it something like myapi.service
-
Explain each section ([Unit], [Service], [Install])
-
Place it in /etc/systemd/system
3) 🐍 Write a start.sh script
- Serves as an entry point for systemd
4) 🚀 Enable and Start the service
- Kick it all off, make systemd aware of an run the files with systemctl
1)
Let's get started by creating, activating and installing requirements in our virtual environment
⏩ Ensure you have virtual env installed, if not use command below
sudo apt install python3-venv
⏩ Create a virtual env called venv
python3 -m venv venv

⏩Activate the venv and install requirements
. venv/bin/activate && pip install -r requirements.txt

✅ And with just a few Linux commands we are ready to move to the next step
2)
Let’s start by creating a systemd service file—this is a configuration file that tells systemd how to run and manage your FastAPI application as a background service.
To confirm you're looking at the correct file on your server, you can view it using the command below:
cat ./systemdDeploy/myapi.service

It’s important to update the User= field in your systemd service file to match your actual Linux username. If you're not using admin as your user, be sure to replace it accordingly to avoid permission issues when starting the service.
If you’re not sure what your current username is, run the command below:
whoami
And replace the 'admin' below with the result of the command above.
[Unit]
Description Fast API Deploy Example
After=network.target

[Service]
User=admin
Group=www-data
WorkingDirectory=/var/www/DeployFastAPI-
Environment="PATH=/var/www/DeployFastAPI-/venv/bin"
ExecStartPre=/bin/rm -f /tmp/uvicorn.sock
ExecStart=/var/www/DeployFastAPI-/systemdDeploy/start.sh
Restart=always
RestartSec=5

[Install]
WantedBy=multi-user.target
And of course if you are following along with your own repo, you need to ensure you replace the lines below with the appropriate working directory, environment and entry point.
WorkingDirectory=/var/www/DeployFastAPI-
Environment="PATH=/var/www/DeployFastAPI-/venv/bin"
ExecStart=/var/www/DeployFastAPI-/systemdDeploy/start.sh
📌 Copy it to systemd folder so that our machine recognizes it as a service
sudo cp /var/www/DeployFastAPI-/systemdDeploy/myapi.service /etc/systemd/system/myapi.service
And then just to be sure let's double check it is where we expect
ls -l /etc/systemd/system/myapi.service
![]()
Ensure the daemon reloads to be made aware of the service file.
sudo systemctl daemon-reload
✅Boom! Another step done painlessly
3)
For the entry point script, I have created a test script for the purposes of this demonstration, you may need to modify it if you are running this on your own repo, similar to the service file part, just ensure that your paths are correct and you should be good to go.
#!/bin/bash

# Activate virtual environment
source /var/www/DeployFastAPI-/venv/bin/activate

# Change to working directory change this if not following along with our repo
cd /var/www/DeployFastAPI-

# Start Gunicorn with Uvicorn worker over a Unix socket
exec gunicorn \
  -k uvicorn.workers.UvicornWorker \
  main:app \
  --chdir app \
  --bind unix:/tmp/uvicorn.sock \
  -w 1 \
  --timeout 30 \
  --graceful-timeout 20
4) 🚀 RUN IT!
sudo systemctl enable myapi && sudo systemctl start myapi
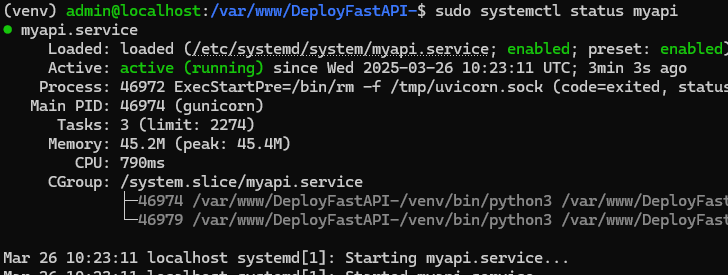
OK and let's check the status of the service to make sure it is working
sudo systemctl status myapi
If everything is working correctly you should see something like below
2) Docker Deployment
🐳 For Docker deployment, we’ll use a custom shell script that I personally rely on whenever setting up a new cloud server.
📜 This script installs both Docker and Docker Compose quickly and securely. You can review the helper script directly on GitHub before running it:
curl -sSL https://raw.githubusercontent.com/codearmo/ShellHelpers/main/docker_install.sh | bash
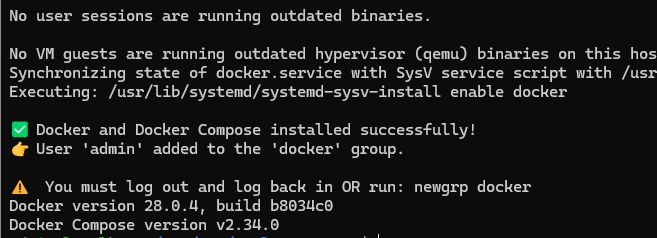
Ok and as the prompt suggests I am going to add a newgrp for docker
newgrp docker
Now that 🐳 Docker is installed and you've added your user to the docker group (using 🆕 newgrp docker), you're ready to build and run your FastAPI app in a container!
Inside the DockerDeploy folder 📂, you'll find a start.sh script — this script will build 🛠️ the Docker image and start the container with your FastAPI app automatically. This script is shown below and hopefully it is easy to modify for your own app!
#!/bin/bash
# Set image and container names
IMAGE_NAME=myapi
CONTAINER_NAME=myapi-app
# Build the Docker image
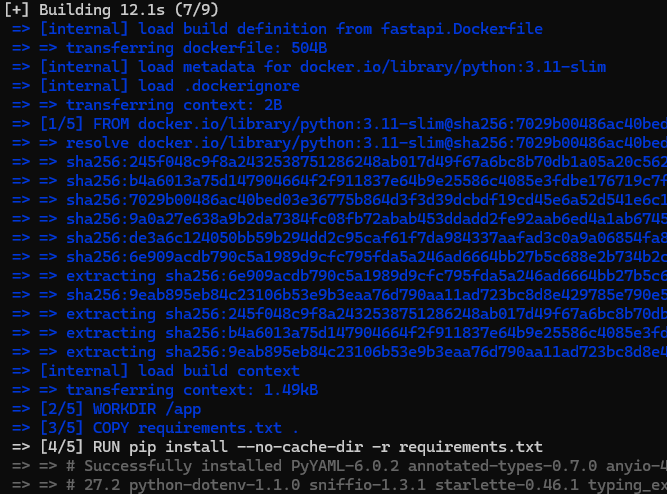
docker build -f DockerDeploy/fastapi.Dockerfile -t $IMAGE_NAME .
# Stop and remove any existing container with the same name
docker rm -f $CONTAINER_NAME 2>/dev/null || true
# Run the container
docker run -d \
--name $CONTAINER_NAME \
--restart always \
-p 8000:8000 \
$IMAGE_NAME
🔐 First, give the script execute permissions with:
chmod +x DockerDeploy/start.sh
🚀 Now let’s run the script to build and launch your FastAPI app in Docker:
./DockerDeploy/start.sh
🧪 Test the Dockerized Fastapi app with curl:
curl http://localhost:8000
And we should see
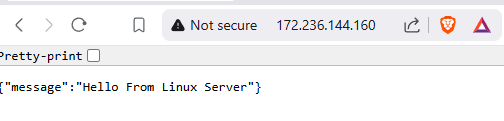
{"message":"Hello From Linux Server"}
Reverse Proxy with Nginx
This step ensures that Nginx recognizes your FastAPI app's configuration and routes incoming traffic correctly — whether you're using a systemd service or a Docker container.
What is Nginx ?
Nginx is a powerful and efficient web server and reverse proxy. In the context of FastAPI, it's used to:
🌐 Why Use Nginx with FastAPI?
- 🔁 Proxy traffic from port 80 (HTTP) or 443 (HTTPS) to your FastAPI application running on a Unix socket or internal port.
- 🧱 Protect your app by hiding internal ports and preventing direct public access to your FastAPI server.
👉 First of all, let’s install Nginx! 🧰
sudo apt update && sudo apt install nginx -y
Allow Nginx through your firewall 🔥
sudo ufw allow 'Nginx Full'
For the Nginx configuration file we will need our server ip address. Usually this is available on the cloud console of your chose cloud service provider, alternatively we can use a handly request from AWS
curl -s http://checkip.amazonaws.com

Ok great so I have mine we will need this for the Nginx server_name variable.
The configuration files for Nginx are a little different depending on whether you are using Docker or Systemd so be sure you are using the right one!
🐳 Docker Nginx Conf
📝 In a real-world setup, you’d avoid editing files directly on the server — but since this is just a quick demo, we’ll go ahead and use sudo nano to manually update the IP address in the config file pulled from GitHub.
sudo nano DockerDeploy/myapi.conf
🖊️ Then, just type your server's IP address or domain name in the server_name field of the config
server {
    listen 80;
    server_name 172.236.144.160;  # Replace with your domain or server IP

    location / {
        proxy_pass http://127.0.0.1:8000;
        proxy_set_header Host $host;
        proxy_set_header X-Real-IP $remote_addr;
        proxy_set_header X-Forwarded-For $proxy_add_x_forwarded_for;
        proxy_set_header X-Forwarded-Proto $scheme;
    }

    location /health {
        proxy_pass http://127.0.0.1:8000/health;
    }
}
📁Systemd Nginx Conf
sudo nano systemdDeploy/myapi.conf
🖊️ Same as the docker setup just put your up at server_name field of the config
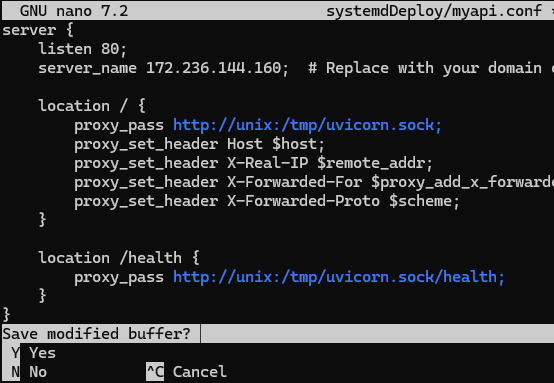
Now that your IP is added to the Nginx config file, copy it to the sites-available folder with the commands specific to your strategy
📁 Systemd Version
sudo cp /var/www/DeployFastAPI-/systemdDeploy/myapi.conf /etc/nginx/sites-available/myapi
🐳 Docker Version
sudo cp /var/www/DeployFastAPI-/DockerDeploy/myapi.conf /etc/nginx/sites-available/myapi
🔗 Enable the Nginx Site (Same for Both Versions 🐳 + 📁 )
sudo ln -s /etc/nginx/sites-available/myapi /etc/nginx/sites-enabled/
🧪 Test the Nginx Configuration
sudo nginx -t

🎉 And let’s get this party started!
sudo systemctl restart nginx
🌐 All being well, you should now be able to visit your FastAPI app in the browser at:
http://{your-server-ip} or http://{your-domain.com}
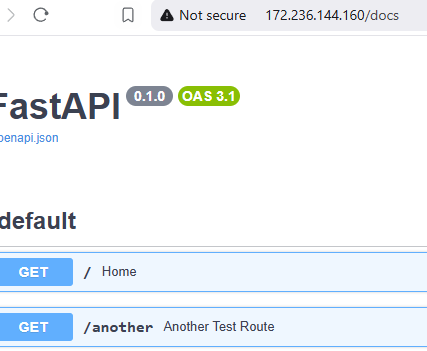
📚 And of course, we might as well check out the FastAPI docs while we're on the server! 🔍✨
http://{your-server-ip}/docs
Commands to Stop and Restart Services
📁 Systemd Commands
# ⛔ Stop the service
sudo systemctl stop myapi

# ♻️ Restart the service
sudo systemctl restart myapi

# ⛔ Disable it from starting on boot
sudo systemctl disable myapi

# ⛔ Remove the service file
sudo rm /etc/systemd/system/myapi.service

# 🔁 Reload systemd to apply the changes
sudo systemctl daemon-reload
🌐 Nginx Commands
# ♻️ Restart Nginx
sudo systemctl restart nginx

# 🔁 Reload Nginx
sudo systemctl reload nginx

# ⛔ Stop Nginx
sudo systemctl stop nginx

# 📋 Check Nginx status
sudo systemctl status nginx
✅ Summary
In this guide, we walked through everything you need to deploy a FastAPI application on a cloud-based Linux server using Nginx. Whether you chose the systemd approach or went with a Docker-based deployment, you now have solid experience to begin your journey with fastapis.