So you’ve built your shiny new website or API, and now it’s time to make it feel official by connecting a custom domain name. Easy, right?
You visit favorite domain registrar, purchase the perfect domain name, and figure you’re done. ✅
But not so fast… 🛑
There’s a bit more to it than just buying the domain. To actually make it work — and get rid of that annoying “Not Secure” message in the browser — you’ll need to:
- 🧭 Set up proper A records in your DNS
- 🔁 Configure Nginx as a reverse proxy
- 🔒 Secure your domain with HTTPS using Certbot and Let’s Encrypt
- 📘 In this guide, we’ll be using the FastAPI app we deployed with Nginx in the last part of this series. 🚀 But 🙏 hopefully it all works just as well if you’re using Flask, Django, or Node.js — as long as your app is behind Nginx.
Oh, and we’ll walk through how to add A records for all the major domain registrars — including Google Domains, GoDaddy, Namecheap, Cloudflare, Bluehost, Alibaba Cloud, and IONOS — so no matter where you bought your domain hopefully you can follow along with this guide and get a free SLL certificate for your new application.
Step 1: Buy & Register a Domain 🔽
🌐 I picked up a cheap domain name fastapitest.cloud from Namecheap for just $4 for this guide. 💸 Of course, you can choose any domain registrar you like, some Google searching should help you find the cheapest domain name registrar currently!

Step 2: Point your domain to a VPS 🔽
Ok so there is a lot of tecnical jargon that is associated with DNS concepts, so here we will try to make things as simple as possible, and assume that the reader can check out concepts they are unfamiliar with.
So with as little tech jarsgon as possible — 💡You want to point your domain name to your server’s IP address using A records
📡 How to Add A Records to Point Your Domain to a Server IP
✅ Sure, there may be a few quirks between different domain registrars — but overall process is nearly always the same. Just follow the steps below.
🔑 DNS Setup:
- Login to your domain registrar
- Go to DNS settings or Zone editor
- Add two A records pointing to your VPS IP
🧭 Now navigate to your domain’s DNS settings inside your registrar’s dashboard — or use the menu below to open the official setup guide for your provider.
🔧 Stuck? Find A Record Settings Guides for Top Domain Registrars (Click to Expand)
Below are direct links to official help docs from the most popular domain registrars. Follow the one that matches your provider to set up A records and connect your domain to your server.
- 🔹 Google Domains – How to configure A records
- 🔹 GoDaddy – Managing DNS records
- 🔹 Namecheap – Add A records to your domain
- 🔹 Cloudflare – Add DNS records to your zone
- 🔹 Bluehost – DNS management and editing guide
- 🔹 Alibaba Cloud – Beginner’s DNS configuration guide
- 🔹 IONOS (1&1) – Change IPv4 (A) or IPv6 (AAAA) records
✅ Step-by-Step Adding A Records
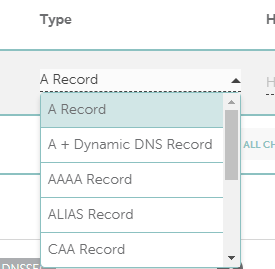
Ok so you need to be sure that you are selecting A record for the type of host record to add
🧩Add the First A Record
- Type: A
- Host / Name: @
- Value / Points to: Your server’s IP address (mine is 172.236.144.160 from the last post)
- TTL: Leave as Automatic or Default
🧩Add the Second A Record
- Type: A
- Host / Name: www
- Value / Points to: Your server’s IP address (mine is 172.236.144.160 from the last post)
- TTL: Leave as Automatic or Default
📌 Why Both?
- @ ensures people can visit yourdomain.com
- www ensures www.yourdomain.com also works
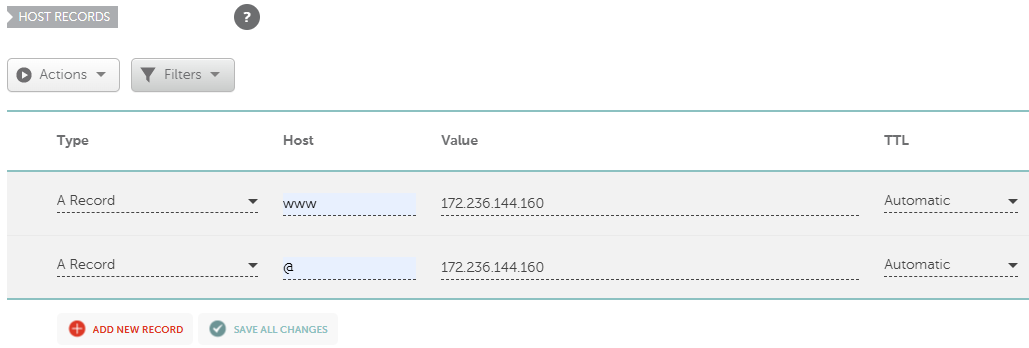
I am happy with my entries, so I click on ✅ save all changes to confirm my new A records
🔥Great not much left to do!
🔁 3. Update Your Nginx Config to Use Your Custom Domain
Now that your DNS is set up, it’s time to head back to your server and make sure your Nginx configuration file is exactly where it should be.
In the last installment of this guide, we created a custom .conf file for our FastAPI app and named it myapi yours of course will be named whatever you called it when creating the setup.
Let’s double-check that it exists inside the Nginx sites-available directory 📁, where all active server configs should live.
List out the contents of sites-available to find your conf file
ls /etc/nginx/sites-available/
![]()
🔥 And great, my conf file is there! You should see the conf file for whatever you named your .conf when you started nginx.
Now that you've pointed your domain to your server using A records, it's time to update your Nginx config so it recognizes and responds to your new domain name — instead of just your IP address.
🔧 How to Edit the Nginx File
🔁 Replace myapi with the actual filename you saw earlier when you listed the files in the /etc/nginx/sites-available/ directory:
sudo nano /etc/nginx/sites-available/myapi

# for you
 # sudo nano /etc/nginx/sites-available/{your site}
🛠️ Editing Nginx config on the server can feel a little fiddly 😕 , but once you are satisfied Press Ctrl + X, then Y, then Enter to save and exit

And as always we need to reload nginx to apply updates to the config.
sudo systemctl reload nginx
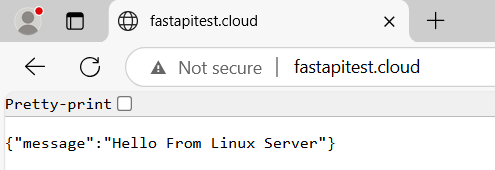
🙌 The good news: You should now be able visit your app by going directly to your custom domain — which means your DNS and Nginx configuration are working perfectly!
😕 The not-so-great news: You'll still see that “Not Secure” warning in the browser’s address bar
🔒 This is because we’re currently serving the site over HTTP instead of HTTPS
👉 Don’t worry — in the next step, we’ll fix that by setting up HTTPS with Certbot and Let’s Encrypt, completely free.
🔐 4. Secure Your Domain with Free SSL: Certbot + Let’s Encrypt for HTTPS
In this section, we’re going to set up a free SSL certificate for your custom domain using Certbot and Let’s Encrypt, so you can say goodbye to those annoying “Not Secure” warnings in your browser when you visit your domain.
Let's install certbot along with another plug-in package to make things easier.
sudo apt update && sudo apt install certbot python3-certbot-nginx -y
Now run the following command, replacing fastapitest.cloud with your domain name (use both root and www):
sudo certbot --nginx -d fastapitest.cloud -d www.fastapitest.cloud
📧 Once that command runs, Certbot will prompt you to enter an email address.
I recommend adding your real email here — if there’s ever a problem renewing your SSL certificate, you’ll get a email, super handy. ✅
