Keeping your Linux server safe from brute-force attacks is a must — especially when it's sitting out there on the public internet 🌍. One of the easiest and most effective ways to harden your SSH access is by using Fail2Ban. The good news is this tool is extremely easy to use and can also be very addictive to check how many IP addresses are currently in jail i.e. blocked.
In this guide we will be using Debian/Ubuntu based distribution.
Ok so whilst writing 10 Things to do on New Linux Server , I booted up a test server using Akamai. At the time of writing, the server had been online for just over 3 hours — and the number of unauthorized login attempts in that short time will surely shock you 😱

🚨 Why You Need Fail2Ban on Your Linux Server
First, let’s take a look at where login attempts are actually recorded on Debian- and Ubuntu-based systems. These logs are an important resource for understanding who’s trying to access your server — both successfully and unsuccessfully
🔍View Log in Attemps
Print of the contents of the following auth file ⬇️
sudo cat /var/log/auth.log
And we will see contents that looks like the output below. Not really the sort of file that is built to be readable, but its a log of the all attempts to log in to my virtual machine.
sudo: pam_unix(sudo:session): session opened for user root(uid=0) by john(uid=1000)
sshd[20466]: Connection closed by 206.168.34.94 port 39806 [preauth]
CRON[20461]: pam_unix(cron:session): session opened for user root(uid=0)
👥Find Unsuccesful Password Login Attemps
sudo grep "Failed password" /var/log/auth.log
The contents of a few failed attempts I found are shown below ⬇️
2025-04-09T22:02:41.324609+00:00 localhost sshd[20007]: Failed password for invalid user admin from 45.135.193.100 port 46038 ssh2
2025-04-09T22:09:44.569161+00:00 localhost sshd[20160]: Failed password for invalid user admin from 196.251.67.42 port 18938 ssh2
2025-04-09T22:19:02.035071+00:00 localhost sshd[20173]: Failed password for root from 87.121.84.211 port 59078 ssh2
As you can see from the logs, there were multiple login attempts from random IP addresses — and that’s just within a span of about 20 minutes ⏱️.
Now, let’s be real — these aren’t people sitting at desks trying to hack into my little $5 server haha.
These are automated bots 🤖, often running on compromised machines. They scan the internet looking for open doors 🔓, and once they find one, they try to break in using brute force.
🔍Find Invalid user Attempts
If you want to check invalid user attempts, you can use the command below ⬇️
sudo grep "Invalid user" /var/log/auth.log
2025-04-09T23:55:44.384036+00:00 localhost sshd[20512]: Invalid user username from 115.231.78.11 port 30000
📈 Count the Number of Failed Attempts
sudo grep "Failed password" /var/log/auth.log | wc -l
For me I had 18 attempts in less than 4 hours to access my virtual machine.
This shows clearly why we need some sort of tool to secure our virtual machines.
🛡️Step-by-Step Install & Configure Fail2ban
1️⃣ Install Fail2Ban
sudo apt update && sudo apt install fail2ban
2️⃣ Start and Enable the Service
sudo systemctl enable fail2ban
sudo systemctl start fail2ban
3️⃣ Create a clean config file
sudo nano /etc/fail2ban/jail.d/sshd.local
Once in the editor, in the sshd.local file, you should change the [sshd] settings to something that looks like the config below. These settings mean that 5 unsuccessful login attempts within 1 hour results in the offending IP address being blocked for 24 hours.
[sshd]
enabled = true
port    = ssh
logpath = %(sshd_log)s
backend = %(sshd_backend)s
maxretry = 5
bantime = 24h
findtime = 1h
5️⃣ Restart Fail2Ban to Apply Changes
Run command below for changes to take effect.
sudo systemctl restart fail2ban
6️⃣ Check Fail2Ban Status to See if Working
sudo fail2ban-client status
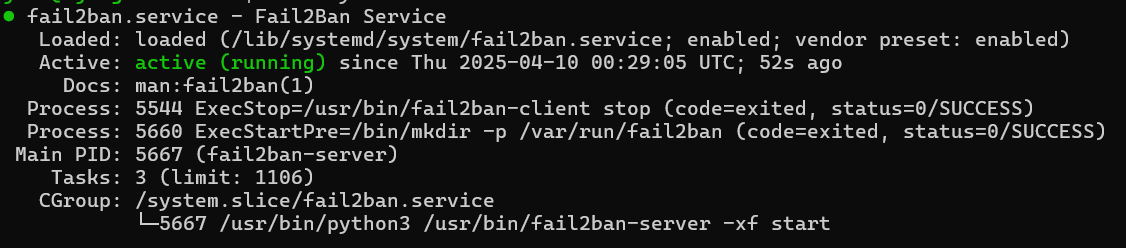
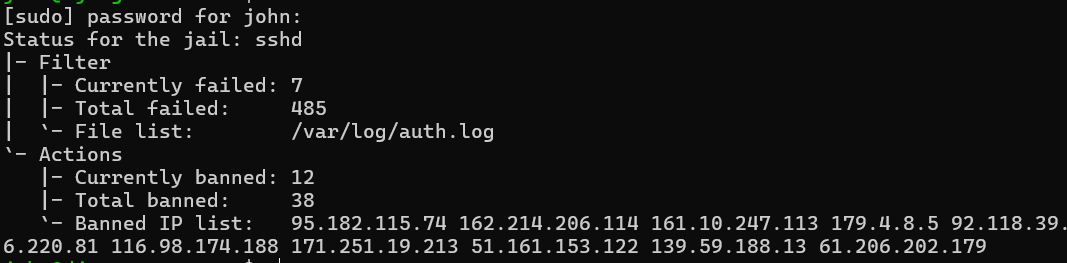
For me at least, it can be quite addictive to check how many baddies are in the fail2ban jail! You can check with the command below ⬇️
sudo fail2ban-client status sshd

🚨🚨 Update 36 hours later
As I said, very addictive to check , and looks like there have been a total of 485 unsuccessfull login attempts to my Linux server! Jail is in danger of becoming overcrowded. If you don't have fail2ban installed , highly recommend doing so now.
In this guide, we walked through how to view unauthorized SSH login attempts on your Linux server using log files like /var/log/auth.log. We then showed you how to install and configure Fail2Ban — a powerful tool that automatically detects and blocks suspicious login behavior. With just a few steps, you’ve taken a big leap toward hardening your virtual machine against brute-force attacks and unwanted access 🔐💪
📚 Further Reading
- 🔗 Clone Private Git Repo to Linux Server
- 🔗 Deploy Fastapi App with Nginx
- 🔗 3 Proven Ways to Run a Python Script on Linux Server