In this post we will be show how to set up a linux server from scratch and clone a private git repo using ssh-keys. If you don't have a cloud provider yet, we recommend using Linode/Akkamai , if you sign up with our referral link you will be entitled to $100 in free credits to experiment with.
Contents
- Configuring a cloud instance to host code
- Creating a sudo user on server
- Disallowing root and password access
- Generating SSH keys
- Adding SSH key to github and cloning a private repo to our server.
Configuring Linode Instance.
If you already have a cloud provider you can skip this step.
The full guide can be found here.
1) Go to your cloud manager and create a new Linode

2) Choose a Distribution (Note we are using Ubuntu 24.04 for this post)

3) Select a region
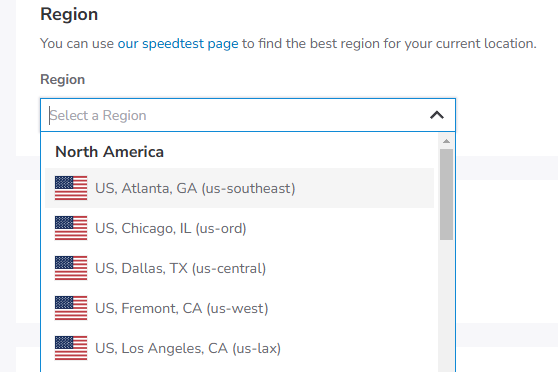
Maybe it is a good idea to choose a region that is geographically near you. Sometimes it can feel laggy if you are connecting from a far away place.
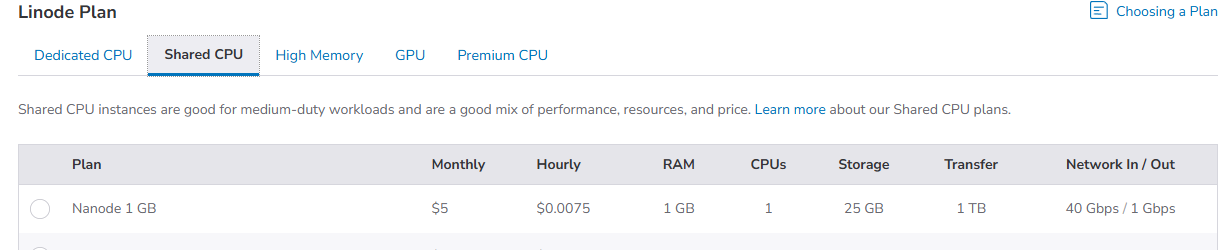
4) Choose a Type and Plan , we advise for those that just want to try things out to click on Shared CPU and then select the cheapest option, it is about $5 which is very reasonable.
5) Choose label, you can name your Linode whatever you like.
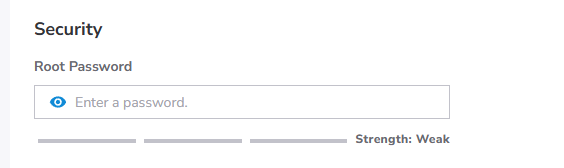
6) Create a root password. This is the password you will use to login in to your server! Don't forget it because it is major pain resetting it.
Login & Configure Server
Now that we have created the instance, we only need one more thing from the Linode dashboard, and that is the public IP , notice the Access header below, we can simply click the little file icon and the ssh root@<instance_ip> will be copied to the clipboard.

Now all we have to do is open up 2 terminals locally. For the remainder of this post, where you see local prefixed to some linux command, this indicates that we are using a local terminal i.e. one not connected to the server.
local$
And if you see the server$ prefixed to some command you will know that we are running this command from the terminal that is connected to our linode.
server$
If you want to copy the commands directly from this page, you can just copy anything that comes after the $ sign on any commands and paste them in to your terminal
OK now we login in to server
server$ ssh root@your_ip_from_linode
We get a weird looking prompt and we type 'yes'
Are you sure you want to continue connecting (yes/no/[fingerprint])? yes
Warning: Permanently added 'your_ip_from_linode' (ED25519) to the list of known hosts.
You will also be prompted for the password we created in step 6 from above. If you see something like root@localhost:~# then you have successfully accessed your server.

Run update and upgrade on the server
server$ sudo apt update && sudo apt upgrade -y
It seems you will get some pop-ups asking about 'restart' something or other, just press enter when you see this, keeping the default of whatever if being asked.
Create a sudo user
I am going to create a sudo user called john because that is my name, you can create a user named anything you like.
server$ adduser john
We then fill out some info on the server , I just leave everything blank apart from setting some password, maybe good idea to be the same as the one you entered for root, we will be disallowing root access anyway, so I think this is ok.
New password:
Retype new password:
passwd: password updated successfully
Changing the user information for john
Enter the new value, or press ENTER for the default
	Full Name []:
	Room Number []:
	Work Phone []:
	Home Phone []:
	Other []:
Is the information correct? [Y/n] Y
Adding new user `john' to supplemental / extra groups `users' ...
Adding user `john' to group `users' ...
Now we add the new user to the sudo group with the following:
server$ usermod -aG sudo john
Now we can switch to be the user we just created with
server$ su - john
Now you should see your username you created in green, on mine it looks like -> john@localhost:~$
Disallow Root Access
It is good practice , after creating our sudo user, to disallow root access to the instance, so let's do that, note you must be in the sudo user e.g. john@localhost:~$ from above.
Type the following to get the config file open.
server$ sudo nano /etc/ssh/sshd_config
This opens, up our config file and we need to change the PermitRootLogin from yes to no.
#LoginGraceTime 2m
PermitRootLogin no
#StrictModes yes
#MaxAuthTries 6
#MaxSessions 10

#PubkeyAuthentication yes
For changes to take effect, we need to restart the ssh
server$ sudo systemctl restart ssh
One more quick thing, before we log out and back in again.
Change the Host Name
Ok my server I have john@localhost:~$ but I don't like this local host name, it isn't very descriptive, I am going to change mine to something else, therefore I want to change it john@localhost:~$ to become john@my_linode_label~$ .
I can do this as follows. I am using "my_linode_label" below as an example, but maybe it is good idea to change it to the same name you gave your linode instance.
server$ sudo hostnamectl set-hostname my_linode_label
Logout and Login back in Again
Logging out of server is very easy , we just type exit twice , the first time we are logging out of sudo user , and the second we are logging out as root.
john@localhost:~$ exit
logout
root@localhost:~# exit
logout
Now we have disconnected from the server, we can connect again using the sudo user we created.
server$ ssh john@your_linode_ip
Since my sudo user is 'john' and when I log back in I now see -> john@mylinodelabel:~$ meaning I successfully created both my sudo user and changed the hostname to match my linode instance.
Creating SSH Keys
If we want our server to be extra secure, we can generate an ssh key locally, send this to the server, and then disallow password authentication. This is of course more secure, but also a headache, if we want to connect from both laptop and desktop, we need to go through the process again. Since we are creating ssh keys for github anyway, it isn't too much effort to set up between local machine and server also.
On your local terminal, type the following:
local$ cat ~/.ssh/id_rsa.pub
If you get an output that says No such file, this means you don't have an rsa key pair generated locally
No such file or directory
So now you need to generate one.
local$ ssh-keygen -t rsa -b 4096
When prompted with the Enter file, thing you see below, you can just hit enter and it will save them as default values.
Enter file in which to save the key (/home/john/.ssh/id_rsa):
I also choose not to use a password for my key, but you can if you want.
Once the key is generated you will see something that looks like the output below, this means our key pair was generated successfully.
+---[RSA 4096]----+
|      o.o=+.     |
|      .+.o=.     |
|     . o..=+.    |
|      = .+++ .   |
Copy SSH from Local Machine to Server
Once created, it is very easy to copy the key from our local machine on to the server. We can do so as follows
local$ ssh-copy-id john@your_linode_ip
Of course replacing 'john' with the sudo user you created and 'your_linode_ip' with the IP address you got from the linode dashboard.
We can check that our key has been successfully copied to the server by switching the the server terminal (Make sure you are logged in to instance) and typing the following
server$ cat ~/.ssh/authorized_keys
You should see your key output in the terminal. You can verify this is the same key by typing on your local terminal
local$ cat ~/.ssh/id_rsa.pub
Disallow Password Authentication
We can disallow password auth by navigating back to our ssh config file with
server$ cd ~ && sudo nano /etc/ssh/sshd_config
Scroll through the file until you see PasswordAuthentication and make sure it is set to no
#IgnoreRhosts yes

# To disable tunneled clear text passwords, change to no here!
PasswordAuthentication no
PermitEmptyPasswords no
And restart our ssh again for changes to take effect
server$ sudo systemctl restart ssh
Note that this is for logging in, you will still have to enter the sudo password when you wanna run sudo commands. You can change this also, but not sure if you should.
Let's log out of our instance and log back in.
server$ exit
Log back in and notice we don't have to enter a password.
server$ ssh john@your_linode_ip
Cloning a Private Git Repo from Server
If you have followed along with the steps below, this next part should seem very easy. We assume you have a private git repo in your github account already and you want to clone it to the server you have just configured.
Generate SSH-Key-Pair on Server
This part will seem familiar, we are simply generating another key-pair to authenticate with github. Let's create the pair
server$ ssh-keygen -t rsa -b 4096
You should be able to see you key with following command
server$ cd ~ && cat .ssh/id_rsa.pub
Copy the output of the command above, and navigate to your Github settings.
- You should see in the sidebar "Access" , and under this heading you should also see “SSH and GPG keys” , click on this item.
- Then click the green "New SSH key" button.
- Give your key some meaningful name and then copy the output of the cd ~ && cat .ssh/id_rsa.pub we did above in to the key section
- Where it asks for Key type , you should just keep the default value of Authentication key
Now that we successfully created our ssh public key on Github we can clone the repo to our server
- Go to the repo you want to clone, and click on the <> Code dropdown button make sure you have the SSH item selected and then copy the url
- Return to the server and you should be able to simply do
server$ git clone git@github.com:your_username/your_project.git
Replacing the git clone git@github.com:your_username/your_project.git with whatever url github provides for you.
You should now be able to see your project by typing 'ls' and your project directory should have been imported to your server.