Getting started with Linux virtual machines can be tough. You need to choose a cloud service provider , get comfortable with the command line, and make sure your server is locked down and secure 🔐.
In this guide, I’ll share the 10 things I always do when setting up a new server. I typically use Ubuntu, but similar steps apply to almost any Linux distribution 🐧 Although the commands will be slightly different e.g. firewalld instead of ufw for Fedora/CentOS/RHEL-based systems so if you are using one of this distributions a lot of the things below may be significantly different.
📋 Contents
- 🔐 Create a Sudo User & Disable Root
- 🏷️ Create Custom Hostname
- 🔑 Create and Use an SSH Key
- ⚙️ Set Up an SSH Alias
- 🔥 Ensure Server Firewall is Enabled
- 🛡️ Install and Configure Fail2Ban
- 🔄 Enable Unattended Updates
- 🔗 Set up GitHub Access
- 📊 Install Basic Monitoring Tools
- 📦 Install Project Specific Packages
I created a fresh Linux server with Linode (by Akamai) for this guide — you can spin one up too for as little as $5/month 🚀.

Since I have just created this server fresh, I will run the obligatory update and ugprade command
sudo apt update && sudo apt upgrade -y
1) Create a Sudo User & Disable Root ✅
Create a new user
- Since my name is john, I will create a user called john
adduser john
- Add myself to the sudo group
usermod -aG sudo john
This gives my user admin privileges
- Switch to new user
su - john
- Test whether it worked
sudo whoami
Should say 'root'
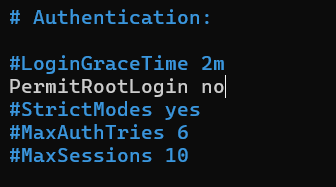
🚫 Disable Root SSH Login
- Open the ssh configuration file & scroll down to change the PermitRootLogin line
sudo nano /etc/ssh/sshd_config
Press Ctrl +x and then Y to save the new config
🔁 Restart SSH
- We need to restart the systemd ssh settings to make the changes take effect
sudo systemctl restart ssh
- Logout typing exit
exit
- Log out of root by typing exit again
exit
Connect to the server again with sudo user
Since my user name is 'john' and the IP adddress I got from Linode is 172.104.187.74 , my command to reconnect is ⬇️
ssh john@172.104.187.74
Just like that — in just a few minutes, we’ve created a sudo user and taken the first steps toward securing our Linux virtual machine. 🔥
2) Set a Hostname ✅
When you're managing multiple Linux virtual machines, things can get confusing fast . Setting a unique hostname for each server is a good idea to ensure we can see at a glance which machine we are actually on.
1️⃣ Check current host name
hostnamectl

OK so obviously localhost is not a very descriptive name, I am going to change mine to 'linuxchecklist'
2️⃣ Set New hostname
sudo hostnamectl set-hostname linuxchecklist
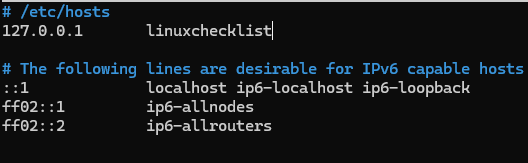
3️⃣ Update the /etc/hosts
sudo nano /etc/hosts
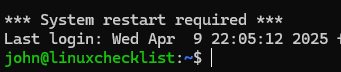
4️⃣ Log out and log back in again and your should see your new host name
3) Create an SSH Key🔑 & Disable Password Authentication ✅
Since the internet can be a dangerous place 🌐, it's best to secure your virtual machines right from the start. Using SSH key authentication is one of the most important steps you can take when setting up a new server — and a practice you should always follow.
For a full guide on setting up, transferring, and connecting with an SSH key, follow the link below:
🔗Need help? Check out my full guide on setting up and using SSH keys.
Disable Password Authentication
If you’ve already added your SSH key to the server’s authorized_keys file (as you should ✅), you can now disable password authentication for SSH logins by following the steps below.
⚠️ Note: This only disables password login for connecting via SSH. You’ll still be asked for your sudo password when performing administrative tasks.
We’ll show a way to disable that too (not always recommended)
Open the same ssh config file we used to disable root login
sudo nano /etc/ssh/sshd_config
Ensure PubkeyAuthentication & PasswordAuthentication are yes & no respectively⬇️

🔁Restart the SSH service
sudo systemctl restart ssh
And the next time you log in you won't have to enter your password 🔥
4) Set up SSH Alias ✅
Let’s be honest — it's nearly impossible to remember the IP address of your virtual machine. And having to log in to your cloud service provider every single time just to check the IP? That gets old fast. And I generally find it is a good idea to make already boring tasks as simple as possible!
That’s why I always set up an SSH alias on my local machine. With it, I can simply type something like:
ssh linuxchecklist
🔗Need help? Check out this Guide on Setting up Alias
Highly recommended to follow this step!
5) Enable UFW Firewall ✅
UFW stands for Uncomplicated Firewall, and the name says it all — it’s built into most Linux distributions and is very easy to use.
Let’s start by checking its current status:
sudo ufw status

Ok since this is a new server, the firewall is inactive which is expected. Before we activate it, we wanna make sure that we won't get locked out of the server, since we already have our ssh key enabled and working from part 3 , we can add these rules before enabling the firewall.
🔓 Allow SSH Connections
sudo ufw allow OpenSSH
sudo ufw allow 22
Enable the firewall.
sudo ufw enable
🔍 Check It’s Working
sudo ufw status verbose
⚙️Set Default Rules
sudo ufw default deny incoming
sudo ufw default allow outgoing
What do these default ufw rules actually do?
❌ Block all incoming connections unless you explicitly allow them (like SSH or HTTP)
✅ Allow all outgoing connections from your server (like API requests, package installs, etc.)
6) Install & Enable Fail2ban✅
Fail2Ban is a simple but powerful tool that protects your server from brute-force attacks 🛡️. It works by monitoring log files (like failed SSH login attempts), and if someone tries and fails too many times, it automatically bans their IP address — either temporarily or permanently.
🔗Still this Full Guide for Installing Fail2ban
Highly recommend following the guide above to ensure your virtual machine is as secure as possible.
🚨🚨🚨 Scary Stat! 🚨🚨🚨
In just 3–4 hours since spinning up the test server for this post, there were already 18 unauthorized login attempts to my virtual machine.
These aren’t people manually typing away — these are bots scanning the internet for vulnerable servers. If you haven’t secured SSH yet, now’s the time. 🔐
7) Enable Unattended Updates ✅
When running a Linux server — especially one that's exposed to the internet — it’s critical to keep your system up to date 🛡️. Security vulnerabilities are constantly being discovered, and updates often include patches that protect you from known threats like brute-force attacks, privilege escalation, or remote code execution exploits.
🛠️ How to Set Up Unattended Upgrades on Ubuntu/Debian
Make sure you have the unattended-upgrades package up-to-date / installed ⬇️
sudo apt update && sudo apt install unattended-upgrades -y
Enable the Upgrades ✅
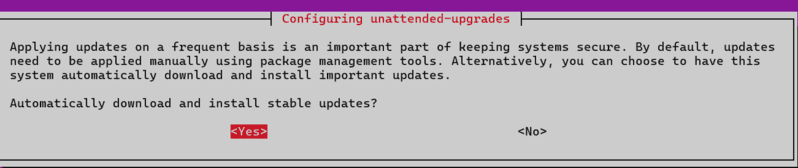
sudo dpkg-reconfigure --priority=low unattended-upgrades
This will prompt you to enable automatic updates — choose Yes by pressing enter ✅
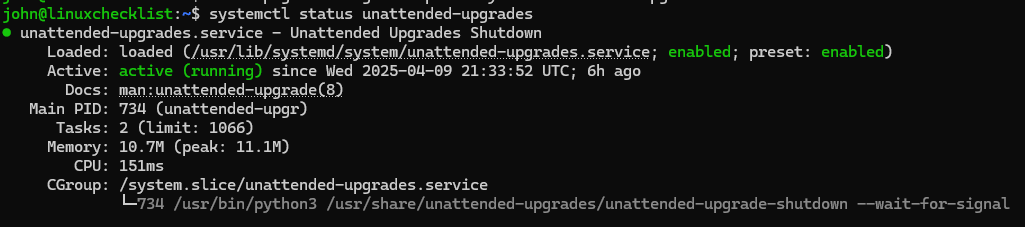
Confirm It’s Active ⬇️
systemctl status unattended-upgrades
8) Set Up SSH Access from Your Server to GitHub ✅
Having access to Github private repos that we don't want exposed to the public world, but do want available from our virtual machines is a necessary step, whether we are deploying a web application or API or even running an algorithmic trading strategy we will need to be able to easily clone code from Github on to our machines.
🔗Still this Full Guide on Setting Up SSH on Github
Highly recommend getting used to this workflow, since most of the time, we need to set it up at some stage anyway, so might as well set it up right from the start!
9) Install Basic Monitoring Tools ✅
1️⃣ htop – Interactive Process Viewer
sudo apt install htop -y
2️⃣ duf – Disk Usage Viewer (cleaner than df)
sudo apt install duf -y
3️⃣ ncdu – Disk Usage Analyzer
sudo apt install ncdu -y
4️⃣ iotop – Disk I/O Monitor
sudo apt install iotop -y
10) Install Project-Specific Tools ✅
This section will likely depend on what you are actually doing on your server, for me I am nearly always using Python and Docker quite extensively. So at this stage I will install my custom install script that I use every time, I spin up a new server.
Before we dive in, a quick heads-up: you should never blindly run scripts from the internet, especially if you don’t know or trust the source (even if it’s from a blog post like this one ). That said, I’ve made my setup scripts public, and if you take a moment to read through them and understand what they’re doing, feel free to follow along 👇
1) Install Python essentials 🐍
Check out the script on github
curl -s https://raw.githubusercontent.com/codearmo/ShellHelpers/main/python_dev_install.sh | bash
2) Install Docker & Docker Compose 🐳
Check out my helper for getting docker and docker compose on Github
curl -s https://raw.githubusercontent.com/codearmo/ShellHelpers/refs/heads/main/docker_install.sh | bash
⚠️ Warning
💡 You can run the script directly with | bash for convenience — but always make sure you trust the source. For best practice, download and review the script before running it. Since it is my script I just use the | bash to keep it easy to remember.
💡 It’s probably a good idea to create your own custom install script for those tools and packages you always use. Trust me — doing the same setup steps over and over again gets old real fast
📚 Further Reading
- 🔗 Run Python Scripts in the Cloud
- 🔗 Deploy Fastapi App with Nginx
- 🔗 Set up Custom Domain Name for your new Web App