SSH keys are the recommended way to securely access cloud virtual machines, push to GitHub, use many file transfer applications and connect to a range of other remote services. In this article, we’ll walk through how to create an SSH key and avoid common pitfalls along the way. 🔐💻
Generate the Key
Let's get straight to it and generate our public/private ssh key. For this example we will use the RSA encryption , use the command below to create the keys.
ssh-keygen -t rsa -b 4096
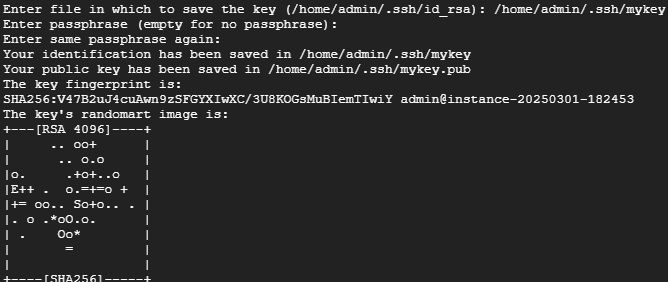
As shown below, you'll be prompted to enter a file path to save your SSH public/private key pair. 🔍

Note that if you leave this blank (which is perfectly fine), the keys will be saved to /home/$USER/.ssh/id_rsa by default. If you prefer to use a different name or location, be sure to enter the full path — not just the filename — or the key will be created in your current working directory (which you probably don’t want)."
Below is an example of saving the key with a custom name instead of the default. This is especially important if you're creating a second SSH key or plan to manage multiple SSH public/private key pairs on your machine. In this case, I use the path /home/admin/.ssh/mykey — where /home/admin/.ssh/ is the .ssh directory (note that admin is my sudo username), and mykey is the custom name I've chosen for the key."

OK since I used a custom key name rather than the default, I will add the key to the ssh-agent ensure to replace 'mykey' with whatever you named your key.
eval "$(ssh-agent -s)"
ssh-add ~/.ssh/mykey
Transfer SSH Key 🔑 to Server
Whilst we can of course just ssh in to the server with password / username, it is probably cleaner to transfer it with the ssh-copy-id, which will send your public key to the destination server
ssh-copy-id -i ~/.ssh/mykey.pub username@ip_addrr
The command above sends the ssh key to the server, ensure you replace username with the sudo username you created when starting the server and the @ipaddrr with your server's IP address. Your public key will now be accessible at ./ssh/authorized_keys on your virtual machine.
🔒 Turn Off Password Authentication on Your Server
If you're creating an SSH key to secure your Linux virtual machine, you can turn off password authentication for stronger protection. First, type the command below to edit your SSH configuration settings ⬇️
sudo nano /etc/ssh/sshd_config
📜 Scroll down in the SSH config file until you find the line that says PasswordAuthentication. Make sure to change its value to no.

🔄 Once you’ve saved the changes, restart the SSH service to apply the new settings. This ensures your server starts enforcing key-based authentication only:
sudo systemctl restart ssh
Connect to Server with SSH Key 🔑
To make sure everything’s working, try connecting to your server using your SSH key. If set up correctly, you won’t be prompted for a password:
ssh -i ~/.ssh/{your_key_name} user@yourserver.com
If you’re in — password authentication is officially off! ✅
Typing ssh -i ~/.ssh/mykey user@yourserver.com every time can get pretty annoying 😩. The good news? You can set up an SSH alias to make your life way easier ⚡️ — just type a short command like ssh myserver instead! Take a read at this post on setting up an ssh alias on your local machine
📚 Further Reading
- 🔗 Learn to Transfer Files from Local Machine to Server
- 🔗 Clone a Git Repo to your Server
- 🔗 3 Proven Ways to Run a Python Script on Linux Server