In this post I’ll show how I fixed the “file is too large for GitHub” error by moving a 100 MB+ SQLite database into Git LFS. First off, it’s worth noting that—whether you use Git LFS or not—GitHub isn’t really built for hosting huge datasets. That said, sometimes it’s pretty convenient to keep code, schema migrations, and data all in one repo. In my case, an SQLite file used to seed a development version of a web app had grown past 100 MB, but the exact same steps work for any big CSV, TXT, or other binary you need to push.
📋 Contents
What is LFS and Why the Issue 🚧?
First off, for a free service, having 100 MB allowed in a single file with multiple versions/branches is actually really good and my instinct to curse each time the issue comes up is somewhat unwarranted. The thing is git ins't really designed to track large files, its purpose is to track incremental changes in code.
So each time the large file (sqlite in my case) gets changed & we commit it, git keeps an entire copy of both the old and new version. Easy to see why this slows things down after a while!
Then on Github's side of things, one can only imagine their cloud costs are already pretty substantial. Since they are bascially handling the world's codebase across multiple servers. Therefore to ensure the service isn't slowed down for everyone the 100MB limit exists, and then Git Large File Storage is there for those times you really need it.
So What is it?
Git LFS handles large files by storing references to the file in the repository, but not the actual file itself. To work around Git's architecture, Git LFS creates a pointer file which acts as a reference to the actual file (which is stored somewhere else). GitHub manages this pointer file in your repository. When you clone the repository down, GitHub uses the pointer file as a map to go and find the large file for you.
What are the new Limits?
🔥 Alright, this seems like the perfect choice for me on the free tier! That said, there are still limits on network traffic—how many times you can download per month—which we’ll cover in the next section.
💰 Git LFS Pricing
First up, here are the Git LFS pricing details as of April 2025. If any of these figures look out of date, please drop us a note on our contact page.
Since this post is aimed at beginners & my case study, I will discuss the free tier vesion. Basically everyone gets 1GB free storage and 1 GB free bandwith.
So in my case the Database is about 200MB let's use that as an example to demonstrate the difference between storage and bandwidth.
Storage
1) I make an initial push to Github LFS with my db , the means storage allowance is reduced 1000mb - 200MB ≈ 800MB remaining.
2) I update the the database by inserting 1 more row, storage gets reduced again, 800mb - 200.xx MB ≈ 600MB remaining
Bandwith
1) My friend clones the repo , this means bandwidth allowance is reduced 1000mb - 200mb ≈ 800MB remaning.
2) Two other collaborators clone the repo 800 MB - 200*2MB = 400MB
Pro Tip
If you are collaborating with friends make sure the repo is in their account and you are added as collaborator, since costs only go to repository owner's account
⚙️ Ubuntu & Windows LFS Install
Ubuntu Installation
sudo apt-get update && sudo apt-get install git-lfs -y
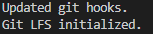
Personally, I decided to install LFS only for a single repository rather than system-wide, if you want to install system-wide just remove the --local flag. I did this by running the command below whilst in the project's root directory. ⬇️
git lfs install --local
Windows Installation
If you have installed git for Windows through the Windows Downloader page and selected all the defaults, then there is a good chance you already have git-lfs on your windows machine. First off let's check if you have it installed or not.
Open a Powershell Prompt :
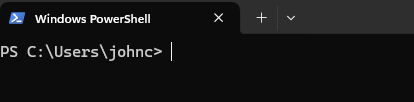
And type in ⬇️
git lfs version
If you see something like the output below that indicates you already have it installed.
![]()
Don't see message above?
If you don't have it installed and are on Windows 10 or later, this probably means you don't have git installed either. As it seems that Git-LFS is just auto included in the versions since at least early 2024. So best just install git. Here we assume some familiarity with Powershell , no doubt many good guides elsewhere on isntalling git for windows though if you get stuck.
Copy paste the line below in to your Powershell Prompt ⬇️
winget install --id Git.Git -e --source winget
Should see something similar to what is displayed in the image below ⬇️

Then type in again to Powershell and you should see it is installed.
git lfs version
📂➕ Add Large File to LFS
Here we should note that the following commands are identical for both Windows and Linux/Ubuntu operating systems.
So first up for me I wanted to add a .db file under git LFS, that was already cached inside the git repo. So if you haven't commited your large file yet, there will be different commands which we will outline below.
1️⃣ Go to your Project Root Directory
This is the folder in which your current .git file is located
2️⃣ Command to Add all File Types to LFS
For me I just wanna add all .db files to Git LFS, so since there is only one sqlite database in my repo I do the following:
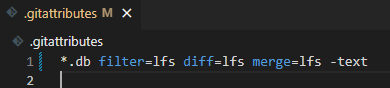
git lfs track "*.db"
And it says Tracking "*.db" in my terminal , also note that this creates a .gitattributes file in root directory with the info shown below.
Ok so what if yours is a csv or a feather file or some other large file?
Well, here you simply need to replace the "*.db" with .csv or .feather or whatever other file extension fits your purpose.
OK next commit your new .gitattributes file:
git add .gitattributes

git commit -m "Track .db files with Git LFS"
OK cool next we need to add the actual database / large file whatever the case may be.
3️⃣Add & Commit Large File
OK so here you need to determine whether it is a new file or a file you have already commited, for my case study , I already had the file in version control so I need to un-cache the file first and then add it so git lfs can pick it up.
Note to follow along you must clearly determine whether your large file is a new file, or a file you already have cached in your repo.
If File is already in Version Control
- un-cache with
git rm --cached path/to/your/large/file
- Add back again so git LFS can acknowledge it
git add path/to/your/large/file
-And commit it again
git commit -m "Move large file into LFS"
Is it a new File ?
Much easier since we already have the gitattributes file all we need to do is commit to the repo as we normally would.
git add path/to/your/large/file
git commit -m "Add large file via LFS"
4️⃣Verify Git-LFS is Tracking New Large File
Type the following command in to your terminal to list which files are being tracked
git lfs ls-files
And here you should see the large file/s that you added. If not repeat this step!
Once happy then you can commit to your current branch as usual.
🤝 Collaborating with Team
If any of your team members do not have Git LFS installed, they will only receive a pointer to the file when they clone the repository, rather than the file itself. Therefore, it is important to ensure all collaborators have Git LFS installed to avoid issues.
🔄 Alternatives
As I mentioned at the beginning of this post, Git & GitHub are not really designed for large‐file storage, and in most cases you shouldn’t really need it anyway. The truth is our problem arose out of a lack of forward thinking, which meant rewriting the dev database population script was more trouble than just going with Git LFS.
The best alternative is usually to plan your project well in advance and have nice scripts that seed the development version of your database each time. Or store the larger files in S3 buckets depending on what you are doing.
Another alternative is to compress and archive the large files and then decompress with a bash / powershell helper script when pushing / pulling from Github, you may find the contents of our post on file transfers and gzipping useful.
📚 Further Reading
- 🔗 Run Python Scripts in the Cloud
- 🔗 Get Started with FastAPI 🚀
- 🔗 Clone Private Git Repo From Linux Server