One of the biggest advantages of cloud computing is the ability to run scripts and applications without keeping your personal computer on 24/7. Whether you're automating tasks, running a web scraper, or maintaining a background service, using the cloud allows you to keep your Python script running continuously with minimal effort.
In this guide, we'll walk through three different methods to run a Python script in the cloud. These approaches will help you choose the best setup based on your needs—whether you prefer a simple, cost-effective method or a more robust, scalable solution.
If you're new to cloud computing, we recommend checking out our previous guide on setting up a cloud server with free credits. This tutorial is designed for Debian-based systems, and we'll assume you're working with a fresh server installation, picking up where we left off last time. To keep things simple, we’ll use basic Python scripts so you can easily follow along without worrying about complex configurations.
Let’s get started!

1) Using Crontab
The Crontab on Linux is a tool that lets us schedule commands or scripts to run at specific times or intervals. So for example, if we wanted to run a script once per hour, Cron is the best way to do this. To keep things really simple, we will make a Python script that writes a message to a .txt file every minute.
First to ensure we are in the home dir type the following:
cd ~
Now that we are in the correct directory, let's make a python script that our crontab will run.
sudo nano py_cron.py
This will open a blank page, copy the Python script below in to the file. And then press Ctrl x , and then type Y to save the file.
import datetime as dt

def write_message_to_file_job(filename='cron_test.txt'):
    current_time = dt.datetime.now().strftime("%Y-%m-%d %H:%M:%S")
    with open(filename, 'a') as file:
        file.write(f"{current_time} - Written by cron\n")

write_message_to_file_job()
OK cool, let's test it out before we move on to scheduling it to run every minute
python3 py_cron.py
After we run that we can check whether the .txt file was written to with and we should see something like the output below.
cat cron_test.txt
'''2025-02-27 11:38:26 - Written by cron'''
Open up the Crontab editor with , if it prompts you to choose an editor, select 1 which will let you use nano , which is very easy to use
crontab -e
The basic syntax for a crontab is
* * * * * /path/to/interpreter /path/to/script.py


┌───────── Minute (0 - 59)
│ ┌───────── Hour (0 - 23)
│ │ ┌───────── Day of the month (1 - 31)
│ │ │ ┌───────── Month (1 - 12)
│ │ │ │ ┌───────── Day of the week (0 - 6) (Sunday = 0 or 7)
│ │ │ │ │
* * * * * command_to_execute
So since we want to run the script every minute, we copy and paste in to the crontab editor.
*/1 * * * * /usr/bin/python3 ~/py_cron.py
So that the screen looks like:
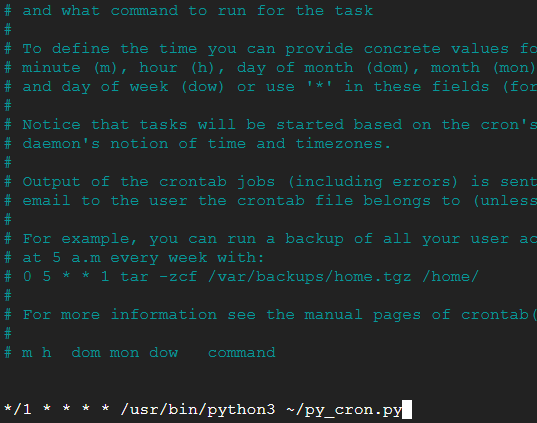
Now press Ctrl x and then Y to save. Taking a quick coffee break and coming back to check whether the .txt file has been updated. To view the contents we simply do
cat cron_test.txt
'''
2025-02-27 11:38:26 - Written by cron
2025-02-27 11:49:01 - Written by cron
2025-02-27 11:50:01 - Written by cron
2025-02-27 11:51:01 - Written by cron
2025-02-27 11:52:01 - Written by cron
2025-02-27 11:53:01 - Written by cron
'''
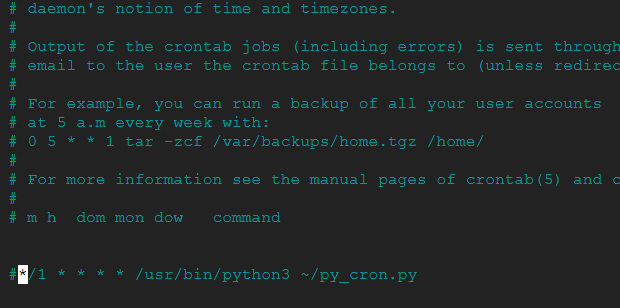
And as expected, we are writing the very simple message to the file every minute. Ok since we don't want this rather useless script printing to a text file every minute, we can again type
crontab -e
And comment out the task as shown below.
In the age of AI, we don't really need to remember exactly how to write the scheduling part of crontab, since AI is incredibly good at this sort of thing. One thing you should be aware of is using a virtual environment. If your package has a venv, you need to be careful to point crontab to the correct folder so that it loads the right dependencies; otherwise, you will encounter errors!
In summary, crontab is a great way to schedule and automate periodic tasks.
2) Detached Screen
Clearly, there are many tasks for which crontab is simply not suited. Consider tasks that are long-running, one-time executions, or processes we want to start manually and let run until completion. Here we need to use something other than crontab and here we will show an example problem and how using a detached screen with the linux screen command can be a useful solution.
Setting up the Problem
For example, imagine we have a large dataset, and processing it is likely to take 24 hours or more. This isn't something we need to run periodically, and it would be even better if we could run it in the background, allowing us to close the server while the script continues running.
Is there a way to achieve this in Linux?
First let's make an example script, that illustrates this type of task.
Ensure you are in your home directory and then
sudo nano screen_task.py
Copy and paste the code below in to the nano editor. Then Ctrl x and Y to save.
import datetime as dt
import random
import time
FILENAME = 'results.csv'

def stopping_time(mins: int):
    return dt.datetime.now() + dt.timedelta(minutes=mins)

def simulate_some_work(x, y):
    return x + y

def process_and_save_work(result: int):
    current_time = dt.datetime.now().strftime("%Y-%m-%d %H:%M:%S")  # Convert date to string

    with open(FILENAME, 'a') as file:
        file.write(f"{current_time},{result}\n")  # Use CSV format with a comma

time_stop = stopping_time(mins=5)

while dt.datetime.now() < time_stop:
    print("Still doing some work....")
    x, y = random.randint(1, 100), random.randint(1, 100)  # Properly assign values
    result = simulate_some_work(x=x, y=y)
    process_and_save_work(result=result)
    print(f"sleeping for 1 second so we don't hammer the CPU")

    time.sleep(1)
OK let's demonstrate the problem first, so we better understand the solution, run this python script with:
python3 screen_task.py
Once that is running you will see on your screen something like the output below being printed out in real time.
2025-02-27 15:39:05,142
2025-02-27 15:39:06,93
2025-02-27 15:39:07,64
2025-02-27 15:39:08,15
2025-02-27 15:39:09,113
2025-02-27 15:39:10,149
2025-02-27 15:39:11,91
2025-02-27 15:39:12,94
2025-02-27 15:39:13,101
2025-02-27 15:39:14,145
2025-02-27 15:39:15,111
2025-02-27 15:39:16,129
Since we don't want to wait the full 5 mintues for this to stop, we can stop the script with Ctrl c
If we were running a script that takes a long time to complete, this setup wouldn't be ideal for a couple of reasons:
1️⃣ Risk of Interruption – If we close the terminal or lose connection, the script might be terminated, causing us to lose progress.
2️⃣ Terminal Lock-In – Since the script runs interactively, we're unable to use the terminal for other tasks while it executes.
Wouldn’t it be great if we could run the script in the background, allowing us to close the terminal while keeping it running safely? Let’s explore a better way to do this in Linux.
Solution
Here, we introduce the powerful screen command, which allows us to run scripts in the background even after closing the terminal.
While still in your home directory, type the following command:
screen -S do_my_task
It may, seem like nothing has happened, but let's run the script again with
python3 screen_task.py
Now that we see the output printing again, let's detach from the screen session so the script continues running in the background.
Ctrl + a, then d
You should see some message like this shown in the terminal
[detached from 3408.do_my_task]
If we want to go back to the running screen we can do
screen -xS do_my_task
And we are taken back to the screen again , since we don't want to wait we type Ctrl a and then d taking us back to our main screen
If the task is really long running and we forget the name of the screen, we can just do :
screen ls
There is a screen on:
3408.do_my_task (02/27/25 15:53:16) (Detached)
We can go back in to the screen with the same screen -xS command as before and then to exit and close the screen we can just type
exit
We should see [screen is terminating] and that's it, you now have a powerful method to run tasks in your Linux VM.
3) System D
systemd is an incredibly useful tool for running scripts 24/7, ensuring they restart automatically if they crash or stop unexpectedly.
While the previous methods work well for certain tasks, systemd is a much better for scripts that need to run continuously without manual intervention. It provides robust process management, automatic restarts, and better integration with the operating system.
Setting up the Problem
For this example, we’ll use a realistic script and a real-world use case to demonstrate running a Python script continuously.
Let’s assume we have a server that is constantly listening to WebSocket messages from an external API. The volume of incoming messages is very high, and our program simply saves them to disk in JSON format.
In real-world applications, this means we end up with a large amount of data taking up significant disk space.
To handle this, we’ll create a systemd service that runs a Python script in the background. This script will format and compress the stored JSON files as they arrive, helping us manage storage efficiently.
Setting Up the Folder Structure
Before writing any code, let’s create the necessary folders on our VM to simulate this process. We need:
- A folder for incoming responses (
response/) - A folder for formatted & compressed data (
formatted/)
mkdir response && mkdir formatted
Before diving into systemd, we need to prepare our environment on the VM to simulate our task.
The first step is to create a method that generates fake data and stores it as JSON files.
To get started, ensure you are in the home directory by running cd ~
sudo nano gen_data.py
This will open a nano editor, copy and paste the python code shown below in to this window and the Ctrl x and Y to save
import json
import datetime as dt
import time
import os
import random
import sys
import string


def generate_random_json_response():
    return {
        "collection_timestamp": dt.datetime.now().timestamp(),
        "value": random.randint(0, 100),
        "another_value": random.randint(0, 100),
        "string_value": "".join(
            random.choices(string.ascii_letters, k=10)
        ),  # Generate a 10-character random string
    }


def generate_random_filename():
    timestamp = (
        dt.datetime.now() + dt.timedelta(minutes=random.randint(0, 59))
    ).strftime(
        "%Y%m%d_%H%M%S"
    )  # Date-based timestamp
    random_string = "".join(
        random.choices(string.ascii_letters, k=30)
    )  # 6-char random string
    return f"response_{timestamp}_{random_string}.json"


def save_to_disk(response: dict):
    response_dir = os.path.expanduser("~/response")
    os.makedirs(response_dir, exist_ok=True)
    filename = generate_random_filename()
    filepath = os.path.join(response_dir, filename)
    with open(filepath, "w") as file:
        json.dump(response, file, indent=4)

    print(f"Saved to {filepath}")


def gen_data(n_data_points):
    for _ in range(n_data_points):
        response = generate_random_json_response()
        save_to_disk(response)


if __name__ == "__main__":
    n_data_points = int(sys.argv[1])
    gen_data(n_data_points)
Let's generate some sample json files to imitate the API responses that a real program would be receiving. The command below will generate 500 sample json responses
python3 gen_data.py 500
We should see a load of output like shown below.
Saved to /home/admin/response/response_20250228_110312_KPgLfCCddxEbAtEfCEcQFmznVSRSYJ.json
Saved to /home/admin/response/response_20250228_104612_diArCoLLJVaViGJvMydEiQQCpcldrQ.json
Saved to /home/admin/response/response_20250228_104712_vAtvJzenJRodKvRtDbacKTSYbzdjBz.json
Saved to /home/admin/response/response_20250228_105612_GERGohjxpVpkcsRdTOdOSfPOoMgyhm.json
Saved to /home/admin/response/response_20250228_103312_PwFjMjdyOWwEVWeSIzazKWwAZSrjuV.json
Image we are getting these responses which look like the output shown below, and they are coming in at a rate of 100000 per minute or some other large number.
{
    "collection_timestamp": 1740738252.373446,
    "value": 22,
    "another_value": 5,
    "string_value": "cAPRyqyuXa"
}
We need a script that continuously monitors this directory to aggregate and compress the data.
Since disk space costs money on cloud platforms, we want to keep our data as small as possible. Additionally, if the disk runs out of space, we risk losing data.
For these reasons, it is essential to manage and process these responses as efficiently as possible.
Solution
First, let's define a Python script that will group all data points by the minute in which they were collected and then save them to a compressed CSV file.
Before proceeding, ensure that you are in the home directory. If you are unsure, run:
cd ~
Next, create the formatter file, which we will later convert into a systemd service. Use the following command to create the file:
sudo nano format_responses.py
import os
import time
import json
import gzip
import csv
from collections import defaultdict
from datetime import datetime

# Directories
response_dir = os.path.expanduser("~/response")
formatted_dir = os.path.expanduser("~/formatted")

# Ensure the formatted directory exists
os.makedirs(formatted_dir, exist_ok=True)

def get_grouped_files():
    files = [f for f in os.listdir(response_dir) if f.startswith("response_") and f.endswith(".json")]
    grouped_files = defaultdict(list)

    for filename in files:
        parts = filename.split("_")
        if len(parts) >= 3:
            time_part = parts[2][:4]
            grouped_files[time_part].append(filename)

    return grouped_files

def process_files(minute, files):
    csv_filename = os.path.join(formatted_dir, f"grouped_{minute}.csv.gz")
    new_data = []

    for file in files:
        file_path = os.path.join(response_dir, file)
        try:
            with open(file_path, "r") as f:
                data = json.load(f)
                data["collection_timestamp"] = datetime.utcfromtimestamp(data["collection_timestamp"]).strftime('%Y-%m-%d %H:%M:%S')
                new_data.append(data)


            os.remove(file_path)

        except Exception as e:
            print(f"Error processing {file}: {e}")

    if new_data:
        file_exists = os.path.exists(csv_filename)
        with gzip.open(csv_filename, mode="at", encoding="utf-8") as gz_file:
            csv_writer = csv.DictWriter(gz_file, fieldnames=new_data[0].keys())

            if not file_exists:
                csv_writer.writeheader()

            csv_writer.writerows(new_data)

        print(f"Saved {len(new_data)} records to {csv_filename}")

def main():

    while True:
        grouped_files = get_grouped_files()
        for minute, files in grouped_files.items():
            process_files(minute, files)
        time.sleep(10)

if __name__ == "__main__":
    main()
Let's test out the script to see if it works
python3 format_responses.py
Since this script is designed to run continuously, you will need to manually stop its execution using Ctrl + C.
Now that we have already generated some fake JSON data, running the following command should produce a long list of processed files:
Saved 9 records to /home/admin/formatted/grouped_1039.csv.gz
Saved 9 records to /home/admin/formatted/grouped_1040.csv.gz
Saved 10 records to /home/admin/formatted/grouped_1104.csv.gz
At this point, we expect the response folder to be empty, while the formatted folder should contain a number of compressed CSV files.
Let's check to confirm:
ls formatted
If everything is working correctly, you should see a list of .csv.gz files grouped by minute, indicating that the service is processing and formatting the responses as expected.
grouped_1015.csv.gz  grouped_1032.csv.gz  grouped_1049.csv.gz  grouped_1106.csv.gz  grouped_1123.csv.gz
grouped_1016.csv.gz  grouped_1033.csv.gz  grouped_1050.csv.gz  grouped_1107.csv.gz
grouped_1017.csv.gz  grouped_1034.csv.gz  grouped_1051.csv.gz  grouped_1108.csv.gz
OK and now let's ensure the response folder is empty
ls response
And this folder should be empty
Creating the systemd Service File
For this example, we will name the service "formatter". When creating the service file, ensure that it ends with the correct .service extension, as shown below.
If you are following along to create a service file for your own program, be sure to replace "formatter" in the command with your chosen service name.
Additionally, we need to identify our username. To check your current username, run the following command:
whoami
For me, the username is admin, but for you it will be different.
OK let's make the service file
sudo nano /etc/systemd/system/formatter.service
Note that anywhere you see admin below you will have to replace it with the username you got from the whoami command above
[Unit]
Description=Format Response Processing Service
After=network.target

[Service]
ExecStart=/usr/bin/python3 /home/admin/format_responses.py
WorkingDirectory=/home/admin
Restart=always
User=admin
Group=admin
StandardOutput=append:/home/admin/format_response.log
StandardError=append:/home/admin/format_response_error.log

[Install]
WantedBy=multi-user.target
Then press Ctrl x and Y to save
Managing the systemd Service
1) Reload systemd
Since we have added a new service file, we need to run the following command to ensure that systemd recognizes the new service:
sudo systemctl daemon-reload
2) Enable & Start the Service
Now that systemd recognizes our new service file, we need to enable it so that it automatically starts when the system boots.
For those following along with a different script, remember to replace "formatter" in the command below with the name of your service file.
sudo systemctl enable formatter.service
Next we start the service
sudo systemctl start formatter.service
The commands above will start the formatter service, ensuring it runs continuously. Now, whenever a JSON response arrives in the response folder, the program will automatically process and save it to the formatted folder.
Let's test it out! First, make sure the response folder is empty. Then, create some new JSON files and observe whether the systemd service processes them as expected.
python3 gen_data.py 500 && ls response
Above we generate 500 new json files and the list the contents of the response directory where they are saved. Notice the output from the ls command is something like
response_20250228_125105_kSGtavlEQfeSzhKXCaXECrxbiQnbed.json
response_20250228_125105_osixrQEsdDHJEpKEqbvXIlktLHcqdx.json
response_20250228_125105_tamBVFSbRpSlsVOmZoCisuhAUrRXDL.json
response_20250228_125205_CbOIBQMoyVjoxdbCUwojRSMvhGfxRJ.json
response_20250228_125205_CtjDtpqjVtslScjYHaPClWzzHPAkwY.json
response_20250228_125205_KXqWekjRmZLLIhUQOimykNvjQAcGQh.json
response_20250228_125205_KnXLPbREmVEfoahVrrwdaFXTmIFPms.json
response_20250228_125205_bGKUHrWYowLkzmXRYBMplFEehvGzZx.json
response_20250228_125205_bzulqUAnXPrqQJwDWKewnLcfBgbftb.json
response_20250228_125205_jFjsuqgwxaTdOhcpSUvighOwwfCZYn.json
response_20250228_125205_lDrjQairRDcgiqpeGVmjMVyejBGkYf.json
After no more than about 10 seconds, we should be able to list the directory again, and if our service file is working, then it should be empty!
ls ~/response
And it works! You should not see any output. And since we don't want this to run always as it is only an example, we can type the command below to stop the service
sudo systemctl stop formatter.service
Why is systemd useful?
In the service file, we included the option Restart=always. This ensures that even if the program encounters an issue and crashes, it will automatically restart as soon as possible. This makes systemd far more reliable than using the screen command, as it guarantees continuous execution.
Summary
In this post, we demonstrated three ways to run Python scripts in the cloud.
- For tasks that need to run periodically,
crontabis the recommended option.
- For tasks that run once and need to be started manually, the
screencommand is a great choice, allowing scripts to continue running even if the terminal is closed.
- For tasks that must run continuously,
systemdprovides a reliable way to keep them running with built-in restart policies to handle failures.
📚 Further Reading